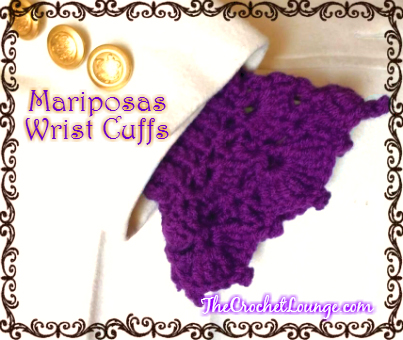
Mariposas Wrist Cuffs - Free Crochet Pattern
Disclaimer: This post contains affiliate links
Join me and thousands of Loungers around the world on social media via one (or many) of these buttons.
♥ ![]()
![]()
![]()
![]()
![]() ♥
♥
After the Mariposas Boot Cuffs pattern debut, I knew there was going to be a matching Mariposas Beanie, wrist cuffs, and some form of neck wear to come in a short time-frame, and I was right. I prefer to be inspired to hook by the hooks and yarn vs. under pressure - because I strongly believe that the energy of a person while creating ANYTHING will go into their final product whether it be their designs, their finished object, etc. and will be felt by others who are on the receiving end.
The force is strong with this stitch pattern ![]() Although the bolero has yet to make its way through the testing stages, its companions are moving along quickly. Wrist cuffs have been on my list to ‘tackle’ since last year and when I finally was inspired to create these, I fell in love with the end product before they were hooked.
Although the bolero has yet to make its way through the testing stages, its companions are moving along quickly. Wrist cuffs have been on my list to ‘tackle’ since last year and when I finally was inspired to create these, I fell in love with the end product before they were hooked.
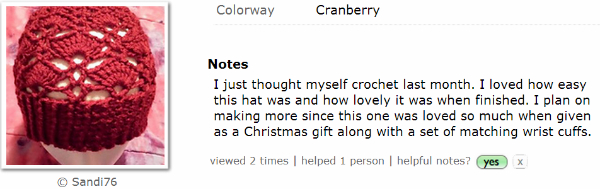
I was truly inspired when I went to Ravelry today and saw a note on Sandi76’s Mariposas Beanie (♥) that she’d only been crocheting FOR A MONTH. She pattern tested the Mariposas Beanie and her stitching was impeccable. If she can pattern test the written pattern, you can make this set of wrist cuffs/boot cuffs/beanie!
Materials
- Worsted Weight yarn - Featured in Red Heart With Love 1 skein (enough to make wrist cuffs and a Mariposas Beanie with left over)
- Any Size Hook to Obtain Gauge (I used a G/6 4.5mm hook)
- Solid colors really show off the stitch - also great for slow variegated yarns if you want the stitch pronounced
Stitches Used
fsc, ch, sc, slst, dc, tr, V-st, 7dc-Fan
Foundation single crochet (fsc) – ch2, insert hook into 2nd chain from hook, yo draw up a loop, yo draw through 1 (this creates the next foundation
chain), yo draw through 2 (this completes the single crochet)
*insert hook into the next foundation chain just created, yo draw up a loop, yo draw through 1, yo draw through 2
Repeat from * until total fsc completed
Yarn over (yo) – wrap yarn over hook
Chain (ch) - yo (yarn over), pull through loop on hook
Single crochet (sc) - insert hook in indicated stitch, yo draw up a loop, yo draw through 2
Slip Stitch (slst) - insert hook in indicated stitch, yo draw through stitch as well as the loop on hook
Half double crochet (hdc) - yo, insert hook in indicated stitch, yo draw up a loop, yo draw through all 3 loops on hook
Front Post hdc (FPhdc) - yo, insert hook from front to back to front from the right side around to the left side of the indicated post (Lefties do the opposite
Back Post hdc (BPhdc) – yo, insert hook from back to front to back from the right side around to the left side of the indicated post (Lefties do the opposite from left to right), yo draw up a loop, yo draw through all 3 loops on hook from left to right), yo draw up a loop, yo draw through all 3 loops on hook
Double Crochet (dc) – yo, insert hook in indicated st (stitch), yo draw up a loop (3 loops on hook), yo draw through 2 loops, yo draw through 2 loops (1 loop on hook)
Treble Crochet (tr) – yo 2 times, insert hook in indicated st (stitch), yo draw up a loop (4 loops on hook), yo draw through 2 loops (3 loops on hook), yo draw through 2 loops (2 loops on hook), yo draw through remaining 2 loops on hook
Special Stitches
Chainless Starting Double Crochet (Standing dc) -
V-Stitch (V-st) - (dc, ch2, dc) in indicated stitch
7dc-Fan - 7dc in indicated stitch
7dc in V-st - 7dc in ch2 spc of indicated V-st
9tr-Fan in V-st - 9tr in ch2 spc of indicated V-st
V-st in 7dc-Fan - V-st in 3rd dc of 7dc-Fan (center dc of the 7dc-Fan)
V-st in V-st - V-st in ch2 spc of indicated V-st
Picot - sc, ch3, slst in the sc just made at the beginning of the picot
Gauge
10 Stitches & 7 Rounds of ribbing in FPhdc, BPhdc + fsc = 2 inches
Height of dc - 5/8″ or 1.5875cm
Height of tr - 1″ or 2.54cm
<Note: It is okay to have a longer golden loop, which creates a higher stitch, but it will also make your cuff longer, so pay attention!>
Measurements
Cuff ribbing 6″ circumference by 2″ height - will stretch to average wrist size (If this feels snug for you, please feel free to up-size the hook you are using for the ribbing portion! Same goes if you need a smaller size ribbing section, downsize the hook for that portion of the pattern.)
Total height from base of fsc to tip of picot on top of 9tr-Fan is 4.75″ or 12.065cm
Golden Loop - after inserting your hook into an indicated stitch, the Golden Loop is the loop you yarn over and draw up. The height of your row/round depends on how high you draw up the Golden Loop. This matters greatly in gauge matching if you are needing to follow hook size and or have already dropped down in hook size and cannot obtain gauge.
Pattern
Cuff Ribbing
fsc 30, slst join to the first fsc being careful not to twist when you join
<Note: When joining fsc in the round, you must also sew the initial tail to the last stitch to form the full circle.
* You can also replace this with Ch30, slst join to the first ch, being careful not to twist when you join, ch1, sc in same st, sc in each ch around, slst to first sc.
* fsc is fantastic to learn because it provides a stretchier fabric vs. the rigid chain start when done>
Cuff Mariposas Lace Flare
Round 1
Ch1,
*BPhdc in next st, FPhdc in next st,
Rpt from *, slst join to first BPhdc
<Note: the last FPhdc goes around the joining st of the prev round and will cover over the beginning ch1 after join>
[15 FPhdc, 15 BPhdc]
Round 2
Ch1, BPhdc in BPhdc from slst join, FPhdc in FPhdc,
*BPhdc in BPhdc, FPhdc in FPhdc,
Rpt from *, slst join to first BPhdc
<Note: the last FPhdc goes around the joining st of the prev round and will cover over the beginning ch1 after join>
[15 FPhdc, 15 BPhdc]
Rounds 3-7 Rpt Round 2
[15 FPhdc, 15 BPhdc]
Round 8
Standing dc, ch2, dc into joining st of the prev round, skp 2 st,
*V-st in next st, skp 2 st,
Rpt from *, slst join to standing dc
<Note: Standing dc, ch2, dc at the beginning of the round counts as the first V-st>
[10 V-st]
Round 9
Slst into ch2 spc,
Standing dc, 6dc in same ch2 spc, V-st in next V-st,
*7dc-Fan in next V-st, V-st in next V-st,
Rpt from *,
Slst join to Standing dc
<Note: Standing dc plus 6dc counts as the first 7dc-Fan>
[5 V-st, 5 7dc-Fan]
Round 10
Slst in next 3 dc,
Standing dc, ch2, dc in same st as standing dc, ch2, V-st in next V-st, ch2,
*V-st in next 7dc-Fan, ch2, V-st in next V-st, ch2,
Rpt from *,
Slst join to standing dc
<Note: Beginning of the round starts in the center dc of 7dc-Fan in previous round and beginning Standing dc, ch2 dc in same st counts as the first V-st>
[10 V-st]

Round 11
Slst into ch2 spc,
Standing dc, ch2, dc in same V-st, 9tr-Fan in next V-st,
*V-st in next V-st, 9tr-Fan in next V-st,
Rpt from *,
Slst join to standing dc
<Note: Standing dc, ch2, dc at the beginning of the round counts as the first V-st>
[5 V-st, 5 9tr-Fan]
Round 12
Picot into ch2 spc,
Slst in next 4 tr, picot in next tr, slst in next 4 tr,
*Picot in next V-st, slst in next 4tr, picot in next tr, slst in next 4tr
Rpt from *,
Slst join to sc of beginning picot, cut 6″ tail
<Note: Beginning of the round starts in the center of a V-st of previous round and no stitches are worked in the dc portions of the V-st — you are only working in the ch2 spc of the V-st plus each tr of the 9tr-Fan in this round>
[5 Picots in V-st, 5 Picots in 9tr-Fan]
Weave in ends
Make a second because you may want a matching cuff! ![]() You can wear them right side out and out of a jacket sleeve, or turn them inside out, so you can fold it up over a sweater or blouse and still have the right side of the stitches showing for a great look. ♥
You can wear them right side out and out of a jacket sleeve, or turn them inside out, so you can fold it up over a sweater or blouse and still have the right side of the stitches showing for a great look. ♥