Tranquil Waves Toddler Sun Hat (Cloche)
Once in a great while, I see or create a stitch pattern and the hook-addict comes out to play. Everything from there on that I can think of and dream up is in that particular stitch - take the entire free crochet pattern set in Mariposas stitch for example: Mariposas Beanie (Bottom-Up) featuring ribbed brim, Mariposas Boot Cuffs, Mariposas y Angeles Beanie (Top-Down) featuring basket weave brim, Mariposas Wrist Cuffs, Mariposas Bolero (yet to be revealed), Mariposas Throw (in final development stage) as an example.
The Tranquil Waves is no exception. This time, after making the Tranquil Waves Underarm Purse, the series has barely lifted off. This toddler cloche-like sun hat will be the first in a toddler set of legwarmers and more in DK (Light Worsted Weight #3)! My lounge friends with mostly dk weight yarn, you are in for a treat ![]()
New addition: Tranquil Waves Teen-Adult (s) Arm Warmer <3
Disclaimer: This post contains affiliate links

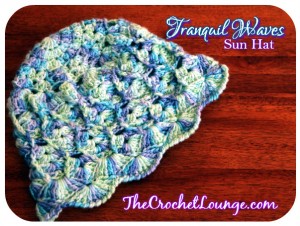
Tranquil Waves Toddler Sun Hat on Tree^3 in Ella Rae Cozy Soft Prints #5 Aqua, Lavender via Knitting Fever, Inc.| The Crochet Lounge™ Free Crochet Pattern
Add this Pattern to Your Ravelry Queue
Come share your WIP or FO, we’d love to see them! — Connect with Loungers at …
♥ 


 ♥
♥
Don’t hesitate to visit me on Facebook or send me an e-mail if you have any pattern specific or crochet related questions! The Loungers are fabulously helpful even if I may not have all the answers ♥ With that said, don’t forget to check your gauge and adjust hook sizes until you find one to match the stated gauge especially on fitted items!
Materials
- 100yds (0.8oz) Sock Yarn (3ply for those downunder) - Sample in photo made in Ella Rae Cozy Soft Prints #5 Aqua, Lavender from Knitting Fever, Inc.
- H-8 (5mm) or Hook Size to Obtain Gauge
- Tapestry Needle
- Scissors/Yarn Cutter
Sizing
Hook & FO Sizing
~8″ from Crown to RSC Brim 18.5″ diameter + stretch
Fits 12-24mo toddler
Gauge
2” (5.08cm) after first 2 rounds - adjust hook size to obtain gauge
Dc height is 0.5″ or 1.27cm
If your gauge is not matching the above within the first 2 to 3 rounds, it’s time to adjust - although mentioned before in the Pineapple Lace Sunhat that it is crucial in hat-making that your gauge matches in the increase rounds or your hat will end up being way too big or way too small, it is LESS critical on a hat made with sock yarn or highly stretchable material vs. 100% cotton.
If your stitching is resulting in a longer round height, you need to adjust your golden loop or drop down in hook size and use the hook that obtains gauge.
Golden Loop - after inserting your hook into an indicated stitch, the Golden Loop is the loop you yarn over and draw up. The height of your row/round depends on how high you draw up the Golden Loop. This matters greatly in gauge matching if you are needing to follow hook size and or have already dropped down in hook size and cannot obtain gauge.
(Righty) Magic Circle, Invisible Join, Color Change in the Round by The Crochet Lounge™
(Lefty) Magic Circle, Invisible Join, Color Change in the Round by The Crochet Lounge™
Front Post Double Crochet tutorial by Crochet Cabana
Standing Double Crochet tutorial by Moogly
Reverse Single Crochet / Crab Stitch tutorial by Crochet Geek
Pattern
Click on the Tabs to access the pattern for each section
<Note: Standing double crochet through out the pattern can be replaced with a starting Ch3 in the round - subsequently any slst join to the top of standing double crochet would be slst join to the top of beginning Ch3. Using beginning standing dc effectively eliminating the need for Ch3 start and makes your crochet work look neater.>
Crown
Magic Circle The Crochet Lounge Way (Click for Righty Tutorial, Lefty Tutorial)
Round 1
12dc into the Magic Circle
[12dc]
Round 2
Standing dc, dc in same st, 2dc in each dc around, slst join to the standing dc
[24dc]
Round 3
Standing dc, 2dc in same st, skp next dc,
*3dc in next dc, skp next dc,
Rpt from *,
Slst join to standing dc
[36dc or 12 3dc-shell]
Round 4
Slst in next st (to center of 3dc-shell),
Standing dc, (dc, ch1, 2dc) in same spc as standing dc,
*2dc-V-st in center of next 3dc-shell,
Rpt from *,
Slst join to Standing dc
[12ch1 spc + 48dc or 12 2dc-V-st]
<Note: You are now working in the center dc of the 3dc-shell in this round>
Round 5
Slst in next 2 st (to ch1 spc of 2dc-V-st),
Standing dc, 4dc in same ch1 spc,
*5dc-fan in next 2dc-V-st,
Rpt from *,
Slst join to Standing dc
[12 5dc-fan or 60dc]
<Note: You are working in the ch1 spc of the V-Shells this round>
Round 6
Slst in next 2 st (to center of 5dc-fan),
Standing dc, (2dc, ch1, 3dc) in same dc, ch1
*3dc-V-st in next 5dc-fan of Round 5, ch1
Rpt from *,
Slst join to Standing dc
[12 3dc-V-st or 72dc and 9 ch1 spc]
<Note: You are working in the center st of the 5dc-fan>
Round 7
Slst in next 3 st, (to ch1 spc of 3dc-V-st)
Standing dc, dc in next 3dc, dc in ch1 spc, dc in next 3 dc (this is the first set that has 8dc - next set will only have 7),
Dc in next ch1 spc, dc in next 3 dc, dc in ch1 spc of 3dc-V-st, skp next dc, dc in next 2 dc, (this set has 7 dc in total)
*dc in next ch1 spc, dc in next 3dc, dc in ch1 spc, dc in next 3 dc (this set has 8dc), dc in next ch1 spc, dc in next 3 dc, dc in ch1 spc of 3dc-V-st, skp next dc, dc in next 2 dc, (this set has 7dc),
Rpt from * slst join to Standing dc
[90dc]
<Note: This round sets up the correct number of stitches for the tranquil waves stitch pattern. In order to get to 90 stitches from 81, there will only be 9 increase stitches occurring every other 3dc-V-st so the count is 7dc, 8dc so on and so forth with the dc right after the ch1 being skipped when a shell only takes on 7dc instead of 8dc>
Round 8: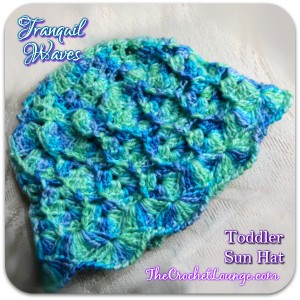
Standing dc or ch3 start,
*skp 3 dc, 3dc-V-st in next dc, skp 3 dc, dc in next dc, ch1, skp next dc, dc in next dc
Rpt from * until one dc remaining, slst to Standing dc
[9 3dc-V-st, 18 dc, 9 ch1 spc]
Round 9:
Slst around the post of the beginning dc of Round 2, standing dc (this acts as the first FPdc),
*3dc-V-st in next 3dc-V-st, FPdc in next dc, ch1, FPdc in next dc
Rpt from * until last dc, FPdc in next dc, ch1, slst join to beginning FPdc
[9 3dc-V-st, 18 FPdc, 9 ch1 spc]
Round 10:
Standing dc, dc in same ch1 spc as the slst join ,
*FPdc around FPdc, V-st in 3dc-V-st, FPdc around FPdc, 2dc-V-st in ch1 spc,
Rpt from * until last FPdc, FPdc around FPdc, 2dc in same ch1 spc worked as the beginning standing dc, ch1, slst to standing dc
Round 11:
Standing dc, 2dc in same ch1 spc as the slst join ,
*FPdc around FPdc, ch1, skp V-st, FPdc around FPdc, 3dc-V-st in 2dc-V-st
Rpt from * until last FPdc, FPdc around FPdc, 3dc in same ch1 spc worked as the beginning standing dc, ch1, slst to standing dc
Round 12:
Standing dc, 2dc in same ch1 spc as the slst join (Note: This is half of a 3dc-V-st),
*FPdc around FPdc, ch1, FPdc around FPdc, 3dc-V-st in 3dc-V-st
Rpt from * until last FPdc, FPdc around FPdc, 3dc in same ch1 spc worked as the beginning standing dc, ch1, slst to standing dc
Round 13:
Standing dc (Note: This is half of a V-st),
*FPdc around FPdc, 2dc-V-st in next ch1 spc, FPdc around FPdc, V-st in 3dc-V-st,
Rpt from * until last FPdc, FPdc around FPdc, dc in same ch1 spc worked as the beginning standing dc, ch1, slst to standing dc
Round 14:
Slst in next FPdc, FPslst around the same FPdc, Standing dc (this will give you a FPdc look at the beginning of your round),
*3dc-V-st in 2dc-V-st, FPdc around FPdc, ch1, skp V-st, FPdc around FPdc,
Rpt from * until last FPdc, FPdc around FPdc, ch1, slst to beginning standing dc
Round 15:
FPslst around the standing dc of last round, Standing dc (this will give you the FPdc look at the beginning of the round),
*3dc-V-st in 3dc-V-st, FPdc around FPdc, ch1, FPdc around FPdc,
Rpt from * until last FPdc, FPdc around FPdc, ch1, slst to beginning standing dc
Round 16:
Repeat Round 10
Brim - Cloche-Like Shells
Round 17
Standing dc, 3dc in same ch1 spc as slst join,
*FPdc in FPdc, ch1, FPdc in FPdc, 4dc-V-st in 2dc-V-st,
Rpt from * until one FPdc remains, FPdc in FPdc, 4dc in same ch1 spc as slst join of last round, ch1, slst join to standing dc
[9 4dc-V-st, 9 ch1 spc]
Round 18
Ch1, sc in same st, 9tr in next ch1 spc,
*sc in ch1 spc of 4dc-V-st, 9tr in next ch1 spc,
Rpt from *, slst join to beginning sc
[9 9tr-fans 9sc]
Round 19
Ch1, sc in slst join, 9tr-fan in next sc, sc in 5th tr of 9tr-fan sl st join to the first sc of the round
[9 9tr-fans 9 sc]
Round 20
Crab stitch (reverse single crochet/rsc) around each stitch in Round 19, cut yarn
Weave in Ends
Did you have fun? I had a blast with this one that I know for sure I will be making more in the near future. Would you like to see more lace hats? Connect with Me - I look forward to hearing from the Loungers ♥ The Crochet Lounge Fan Page on facebook or The Crochet Lounge G+


![It's a Pineapple! | The Crochet Lounge | Free Crochet Wrist Bag, Opera Bag, Yarn Tote Pattern [blue]](../../wp-content/uploads/2013/07/TCL_ItsaPineapple_Blue_F.jpg) Ch3, 2dc in same spc, dc in next ch3 spc,
Ch3, 2dc in same spc, dc in next ch3 spc,