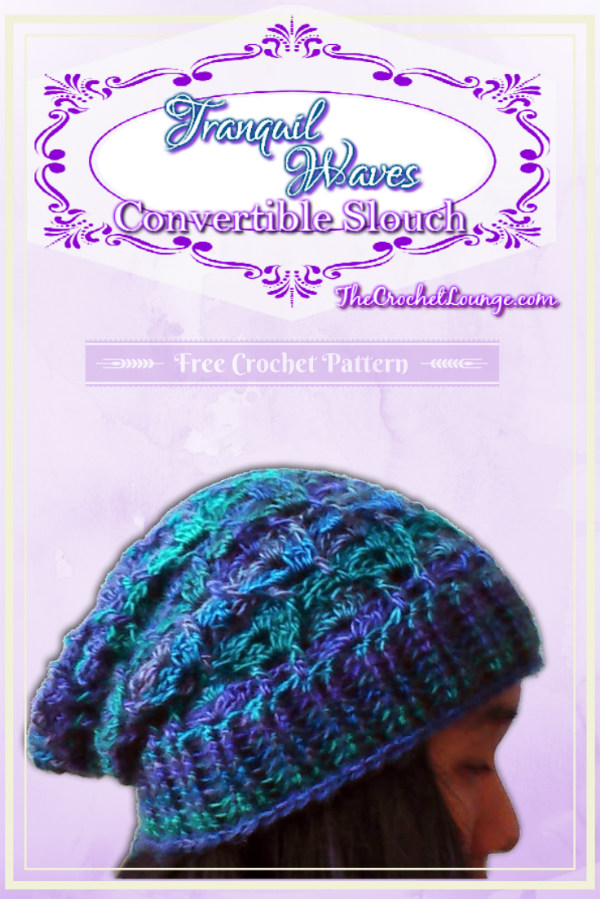
Tranquil Waves Convertible Slouch
Fold brim up for a doubly warm brimmed beanie
After the Tranquil Waves Arm Warmer Teen to Adult (s), Tranquil Waves Underarm Purse, Tranquil Waves Toddler Cloche-like Sun Hat, and the unpublished Tranquil Waves Basket, I felt a calling for a beanie/slouch in this addicting stitch pattern. While we wait for the arm warmers in larger sizes and the toddler leg warmers still in the wing, this convertible beanie/slouch pattern is out to play.
Playing for eons on the type of slouchiness I like, I think I’ve finally found one that didn’t scream Rasta and didn’t scream Smurfette… what do you think?
Disclaimer: This post contains affiliate links
Add this Pattern to Your Ravelry Queue
Don’t hesitate to visit me on Facebook or send me an e-mail if you have any pattern specific or crochet related questions! The Loungers are fabulously helpful even if I may not have all the answers ♥ With that said, don’t forget to check your gauge and adjust hook sizes until you find one to match the stated gauge especially on fitted items!
Materials
- 300-350yds Worsted Weight Yarn sample in Red Heart Boutique Unforgettable
The Tranquil Waves Slouch and Arm Warmers in Teen to Adult (s) can be made with 2 skeins of Red Heart Boutique Unforgettable - I-9 (5.5mm), J-10 (6.0mm) or Hook Size to Obtain Gauge
- Tapestry Needle
- Scissors/Yarn Cutter
Sizing
Hook & FO Sizing
~10″ from Crown to RSC Brim 18.5″ diameter + stretch
Gauge
7 stitches and 8 rounds of ribbing per 2” (5.08cm) - adjust hook size to obtain gauge
Dc height is 0.5″ or 1.27cm
If your gauge is not matching the above within the first 2 to 3 rounds, it’s time to adjust - although it is a must on crochet hats, it is less crucial on arm warmers. This pattern does have a tapered look from decreasing at the Lower Forearm section, so if your Upper Forearm stitching is running long, you may need to start the decrease sooner. As always, it is easier to follow a gauge than to end up with a piece that is not the desirable size on a fitted item.
If your stitching is resulting in a longer round height, you need to adjust your golden loop or drop down in hook size and use the hook that obtains gauge.
Golden Loop - after inserting your hook into an indicated stitch, the Golden Loop is the loop you yarn over and draw up. The height of your row/round depends on how high you draw up the Golden Loop. This matters greatly in gauge matching if you are needing to follow hook size and or have already dropped down in hook size and cannot obtain gauge.
Stitches
Yarn over (yo) – wrap yarn over hook
Chain (ch) – yo, pull through loop on hook
Slip Stitch (slst) - insert hook in indicated stitch, yo draw through stitch and loop on hook
Single crochet (sc) - insert hook in indicated stitch, yo draw up a loop, yo draw through 2
Double Crochet (dc) – yo, insert hook in indicated st (stitch), yo draw up a loop (3 loops on hook), yo draw through 2 loops, yo draw through 2 loops (1 loop on hook)
Front Post Double Crochet (FPdc) - yo, insert hook from front to back to front from the right side around to the left side of the indicated post (Lefties do the opposite from left to right), yo draw up a loop, , yo draw through 2 loops, yo draw through 2
Standing Double Crochet (standing dc)- This stitch replaces the ch3 start so you have a cleaner look on your piece (in fact, the starting stitch will almost be undetectable)
Front Post Double Crochet decrease (FPdc2tog) - yo, insert hook from front to back to front from the right side around to the left side of the indicated post (Lefties do the opposite from left to right), yo draw up a loop, yo draw through 2 loops, yo, insert hook from front to back to front from the right side around to the left side of the next indicated post (Lefties do the opposite from left to right), yo draw up a loop, yo draw through 2 loops on hook, yo draw through remaining 3 loops on hook
Special Stitches
3 Double Crochet Shell (3dc Shell) - 3dc in indicated stitch
9tr-Fan - 9tr in indicated stitch
V-Stitch (V-st) - (dc, ch1, dc) in indicated stitch
2 Double Crochet V-Stitch (2dc-V-st) - (2dc, ch1, 2dc) in indicated stitch
3 Double Crochet V-Stitch (3dc-V-st) - (3dc, ch1, 3dc) in indicated stitch
4 Double Crochet V-Stitch (4dc-V-st) - (3dc, ch1, 3dc) in indicated stitch
V-st in 3dc-V-st - V-st in ch1 spc of indicated 3dc-V-st
3dc-V-st in 3dc-V-st - (3dc, ch1, 3dc) in ch1 spc of previous round’s 3dc-V-st
3dc-V-st in 2dc-V-st - (3dc, ch1, 3dc) in ch1 spc of previous round’s 2dc-V-st
(Righty) Magic Circle, Invisible Join, Color Change in the Round by The Crochet Lounge™
(Lefty) Magic Circle, Invisible Join, Color Change in the Round by The Crochet Lounge™
Front Post Double Crochet tutorial by Crochet Cabana
Standing Double Crochet tutorial by Moogly
Pattern
Click on the Tabs to access the pattern for each section
<Note: Standing double crochet through out the pattern can be replaced with a starting Ch3 in the round - subsequently any slst join to the top of standing double crochet would be slst join to the top of beginning Ch3. Using beginning standing dc effectively eliminating the need for Ch3 start and makes your crochet work look neater.>
Brim Ribbin
Fsc 72, slst join to first fsc, sew the beginning tail to last fsc
<Note: When using fsc joined in the round, you must also join the beginning tail to the bottom of the last fsc in the round so that the ‘foundation chain’ portion is joined as well as the ‘sc’ portion, which is slst joined to the first fsc.>
Round 1
Ch1, *BPhdc around next post, FPhdc around next post, FPhdc around next post,
Rpt from *, slst to beginning ch1
<Note: The last FPhdc goes around the post where the first and last fsc is joined together. If you do not sew in the beginning tail to the last fsc before starting Row 1, it may look like there are 2 posts remaining.>
[24 BPhdc, 48 FPhdc]
Round 2
<Note: If you find it difficult to start without a ch1, go ahead and make a ch1, otherwise, you can actually go straight into the post stitches>
*BPhdc around BPhdc, FPhdc around FPhdc, FPhdc around FPhdc,
Rpt from *, slst join to beginning BPhdc
[24 BPhdc, 48 FPhdc]
Rounds 3 -8
Repeat Roound 2
[24 BPhdc, 48 FPhdc]
<Note: This creates a close to 2″ or 5cm band>
Body
Round 9:
Standing dc or ch3 start,
*skp 2 sts, 3dc-V-st in next st, skp next 2 sts, dc in next st, ch1, skp next st, dc in next st,
Rpt from * until one st remaining, slst to Standing dc
[9 3dc-V-st, 18 dc, 9 ch1 spc]
Round 10:
Slst around the post of the beginning dc of previous round, standing dc (this acts as the first FPdc),
*3dc-V-st in next 3dc-V-st, FPdc in next dc, ch1, FPdc in next dc
Rpt from * until last dc, FPdc in next dc, ch1, slst join to beginning FPdc
[9 3dc-V-st, 18 FPdc, 9 ch1 spc]
Round 11:
Standing dc, dc in same ch1 spc as the slst join ,
*FPdc around FPdc, V-st in 3dc-V-st, FPdc around FPdc, 2dc-V-st in ch1 spc,
Rpt from * until last FPdc, FPdc around FPdc, 2dc in same ch1 spc worked as the beginning standing dc, ch1, slst to standing dc
[9 V-st, 18 FPdc, 9 2dc-V-st]
Round 12:
Standing dc, 2dc in same ch1 spc as the slst join <Note: This is half of a 3dc-V-st>,
*FPdc around FPdc, ch1, skp V-st, FPdc around FPdc, 3dc-V-st in 2dc-V-st
Rpt from * until last FPdc, FPdc around FPdc, 3dc in same ch1 spc worked as the beginning standing dc, ch1, slst to standing dc
[9 3dc-V-st, 18 FPdc, 9 ch1 spc]
Round 13:
Standing dc, 2dc in same ch1 spc as the slst join <Note: This is half of a 3dc-V-st>,
*FPdc around FPdc, ch1, FPdc around FPdc, 3dc-V-st in 3dc-V-st
Rpt from * until last FPdc, FPdc around FPdc, 3dc in same ch1 spc worked as the standing dc, ch1, slst to standing dc
[9 3dc-V-st, 18 FPdc, 9 ch1 spc]
Round 14:
Standing dc <Note: This is half of a V-st>,
*FPdc around FPdc, 2dc-V-st in next ch1 spc, FPdc around FPdc, V-st in 3dc-V-st,
Rpt from * until last FPdc, FPdc around FPdc, dc in same ch1 spc worked as the beginning standing dc, ch1, slst to standing dc
[9 V-st, 18 FPdc, 9 2dc-V-st]
Round 15:
Slst in next FPdc, FPslst around the same FPdc, Standing dc <Note: this will give you a FPdc look at the beginning of your round & counts as first FPdc>,
*3dc-V-st in 2dc-V-st, FPdc around FPdc, ch1, skp V-st, FPdc around FPdc,
Rpt from * until last FPdc, FPdc around FPdc, ch1, slst to beginning standing dc
[9 3dc-V-st, 18 FPdc, 9 ch1 spc]
Round 16:
FPslst around the standing dc of last round, Standing dc (this will give you the FPdc look at the beginning of the round),
*3dc-V-st in 3dc-V-st, FPdc around FPdc, ch1, FPdc around FPdc,
Rpt from * until last FPdc, FPdc around FPdc, ch1, slst to beginning standing dc
[9 3dc-V-st, 18 FPdc, 9 ch1 spc]
Round 17:
Repeat Round 11
Rounds 18-29-:
Repeat Rounds 12-17
Crown (Decreases in pattern stitch)
Round30:
Standing dc, dc in same ch1 spc as the slst join <Note: This is half of a 2dc-V-st>,
*FPdc around FPdc, ch1, skp V-st, FPdc around FPdc, 2dc-V-st in 2dc-V-st
Rpt from * until last FPdc, FPdc around FPdc, 2dc in same ch1 spc worked as the beginning standing dc, ch1, slst join to standing dc
[9 2dc-V-st, 18 FPdc, 9 ch1 spc]
Round 31:
Standing dc <Note: This is half of a V-st>,
*FPdc around FPdc, ch1, FPdc around FPdc, V-st in 2dc-V-st,
Rpt from * until last FPdc, FPdc around FPdc, dc in same ch1 spc worked as the beginning standing dc, ch1, slst to standing dc
[9 V-st, 18FPdc, 9 ch1 spc]
Round 32:
Standing dc <Note: This is half of a V-st>,
*FPdc around FPdc, V-st in ch1 spc, FPdc around FPdc, V-st in V-st,
Rpt from * until last FPdc, FPdc around FPdc, dc in same ch1 spc worked as the beginning standing dc, ch1, slst to standing dc
[18 V-st, 18FPdc]
Round 33:
Standing dc,
*FPdc around FPdc, dc in V-st, FPdc around FPdc,
Rpt from *, slst to standing dc
[18 dc, 18FPdc]
Round 34:
FPslst around next FPdc, standing dc <Note: This counts as a FPdc>, skp next dc,
*FPdc around next FPdc, skp next dc,
Rpt from *, slst to beginning standing dc
[18 FPdc]
Round 35:
<Note: In this round, you are going to FPdc2tog to draw the stitches in, reducing by 9 stitches. The first decrease may read tricky but is just composed of half a standing dc and an FPdc together to form the decrease as any normal dc2tog decreases>
FPslst around FPdc, partial standing dc (only draw through the first 2 loops leaving 2 on hook), partial FPdc around next FPdc, 3 loops on hook, yo draw through all 3 loops on hook to finish the first FPdc2tog,
*FPdc2tog,
Rpt from * 7 more times, slst to standing dc
[9 FPdc2tog]
Round 36:
FPslst around FPdc, Standing dc, *FPdc2tog,
Rpt from * 3 more times, slst to standing dc
[1 Standing dc, 4 FPdc2tog]
Cut yarn
Weave in Ends
Come share your finished convertible slouch with us because you can inspire someone else with your unique color choices and personal touch! ♥ The Crochet Lounge Fan Page on facebook or The Crochet Lounge G+