Nov 292014
Oct 072014
Oct 042014
Apr 192014
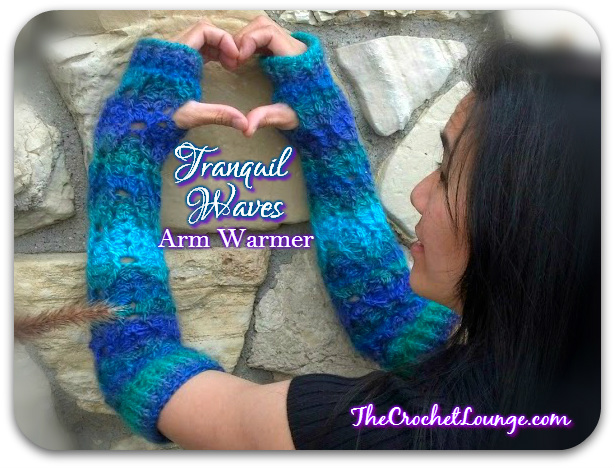
Tranquil Waves Arm Warmer
Teen - Adult (S)
Have you seen the Tranquil Waves Underarm Purse, Tranquil Waves Toddler Cloche-like Sun Hat, or the Tranquil Waves Basket? There simply can’t be enough Tranquil Waves patterns, so we’ll be hooking up the Arm Warmers in larger sizes soon as well as the toddler leg warmers and adult slouch hat!
Disclaimer: This post contains affiliate links
Add this Pattern to Your Ravelry Queue
Come share your WIP or FO, we’d love to see them! — Connect with Loungers at …
♥ 


 ♥
♥
Don’t hesitate to visit me on Facebook or send me an e-mail if you have any pattern specific or crochet related questions! The Loungers are fabulously helpful even if I may not have all the answers ♥ With that said, don’t forget to check your gauge and adjust hook sizes until you find one to match the stated gauge especially on fitted items!
Materials
- 300-350yds Worsted Weight Yarn sample in Red Heart Boutique Unforgettable
The Tranquil Waves Slouch and Arm Warmers in Teen to Adult (s) can be made with 2 skeins of Red Heart Boutique Unforgettable - H-8 (5mm), I-9 (5.5mm), J-10 (6.0mm) or Hook Size to Obtain Gauge
- Tapestry Needle
- Scissors/Yarn Cutter
Sizing
Hook & FO Sizing
~8″ from Crown to RSC Brim 18.5″ diameter + stretch
Gauge
Pattern stitches are 2 rounds per inch — adjust hook size to obtain gauge
Dc height is 0.5″ or 1.27cm
If your gauge is not matching the above within the first 2 to 3 rounds, it’s time to adjust - although it is a must on crochet hats, it is less crucial on arm warmers. This pattern does have a tapered look from decreasing at the Lower Forearm section, so if your Upper Forearm stitching is running long, you may need to start the decrease sooner. As always, it is easier to follow a gauge than to end up with a piece that is not the desirable size on a fitted item.
If your stitching is resulting in a longer round height, you need to adjust your golden loop or drop down in hook size and use the hook that obtains gauge.
Golden Loop - after inserting your hook into an indicated stitch, the Golden Loop is the loop you yarn over and draw up. The height of your row/round depends on how high you draw up the Golden Loop. This matters greatly in gauge matching if you are needing to follow hook size and or have already dropped down in hook size and cannot obtain gauge.
Stitches
Yarn over (yo) – wrap yarn over hook
Chain (ch) – yo, pull through loop on hook
Slip Stitch (slst) - insert hook in indicated stitch, yo draw through stitch and loop on hook
Single crochet (sc) - insert hook in indicated stitch, yo draw up a loop, yo draw through 2
Double Crochet (dc) – yo, insert hook in indicated st (stitch), yo draw up a loop (3 loops on hook), yo draw through 2 loops, yo draw through 2 loops (1 loop on hook)
Front Post Double Crochet (FPdc) - yo, insert hook from front to back to front from the right side around to the left side of the indicated post (Lefties do the opposite from left to right), yo draw up a loop, , yo draw through 2 loops, yo draw through 2
Standing Double Crochet (standing dc)- This stitch replaces the ch3 start so you have a cleaner look on your piece (in fact, the starting stitch will almost be undetectable)
Special Stitches
3 Double Crochet Shell (3dc Shell) - 3dc in indicated stitch
9tr-Fan - 9tr in indicated stitch
V-Stitch (V-st) - (dc, ch1, dc) in indicated stitch
2 Double Crochet V-Stitch (2dc-V-st) - (2dc, ch1, 2dc) in indicated stitch
3 Double Crochet V-Stitch (3dc-V-st) - (3dc, ch1, 3dc) in indicated stitch
4 Double Crochet V-Stitch (4dc-V-st) - (3dc, ch1, 3dc) in indicated stitch
V-st in 3dc-V-st - V-st in ch1 spc of indicated 3dc-V-st
3dc-V-st in 3dc-V-st - (3dc, ch1, 3dc) in ch1 spc of previous round’s 3dc-V-st
3dc-V-st in 2dc-V-st - (3dc, ch1, 3dc) in ch1 spc of previous round’s 2dc-V-st
Pattern
Click on the Tabs to access the pattern for each section
<Note: Standing double crochet through out the pattern can be replaced with a starting Ch3 in the round - subsequently any slst join to the top of standing double crochet would be slst join to the top of beginning Ch3. Using beginning standing dc effectively eliminating the need for Ch3 start and makes your crochet work look neater.>
Upper Arm Ribbing
Fsc 40, slst join to first fsc, sew the beginning tail to last fsc
<Note: When using fsc joined in the round, you must also join the beginning tail to the bottom of the last fsc in the round so that the ‘foundation chain’ portion is joined as well as the ‘sc’ portion, which is slst joined to the first fsc.>
Round 1
Ch1, *BPhdc around next post, FPhdc around next post,
Rpt from *, slst to beginning ch1
<Note: The last FPhdc goes around the post where the first and last fsc is joined together. If you do not sew in the beginning tail to the last fsc before starting Row 1, it may look like there are 2 posts remaining.>
[20 BPhdc, 20 FPhdc]
Round 2
<Note: If you find it difficult to start without a ch1, go ahead and make a ch1, otherwise, you can actually go straight into the post stitches>
*BPhdc around BPhdc, FPhdc around FPhdc
Rpt from *, slst join to beginning BPhdc
[20 BPhdc, 20 FPhdc]
Rounds 3 -5
Repeat Roound 2
[20 BPhdc, 20 FPhdc]
Upper Forearm
Round 6:
Standing dc or ch3 start,
*skp 3 dc, 3dc-V-st in next dc, skp 3 dc, dc in next dc, ch1, skp next dc, dc in next dc
Rpt from * until one dc remaining, slst to Standing dc
[4 3dc-V-st, 8 dc, 4 ch1 spc]
Round 7:
Slst around the post of the beginning dc of previous round, standing dc (this acts as the first FPdc),
*3dc-V-st in next 3dc-V-st, FPdc in next dc, ch1, FPdc in next dc
Rpt from * until last dc, FPdc in next dc, ch1, slst join to beginning FPdc
[4 3dc-V-st, 8 FPdc, 4 ch1 spc]
Round 8:
Standing dc, dc in same ch1 spc as the slst join ,
*FPdc around FPdc, V-st in 3dc-V-st, FPdc around FPdc, 2dc-V-st in ch1 spc,
Rpt from * until last FPdc, FPdc around FPdc, 2dc in same ch1 spc worked as the beginning standing dc, ch1, slst to standing dc
[4 V-st, 4 2dc-V-st, 8 FPdc]
Round 9:
Standing dc, 2dc in same ch1 spc as the slst join <Note: This is half of a 3dc-V-st>,
*FPdc around FPdc, ch1, skp V-st, FPdc around FPdc, 3dc-V-st in 2dc-V-st
Rpt from * until last FPdc, FPdc around FPdc, 3dc in same ch1 spc worked as the beginning standing dc, ch1, slst to standing dc
[4 3dc-V-st, 8 FPdc, 4 ch1 spc]
Round 10:
Standing dc, 2dc in same ch1 spc as the slst join <Note: This is half of a 3dc-V-st>,
*FPdc around FPdc, ch1, FPdc around FPdc, 3dc-V-st in 3dc-V-st
Rpt from * until last FPdc, FPdc around FPdc, 3dc in same ch1 spc worked as the standing dc, ch1, slst to standing dc
[4 3dc-V-st, 8 FPdc, 4 ch1 spc]
Round 11:
Standing dc <Note: This is half of a V-st>,
*FPdc around FPdc, 2dc-V-st in next ch1 spc, FPdc around FPdc, V-st in 3dc-V-st,
Rpt from * until last FPdc, FPdc around FPdc, dc in same ch1 spc worked as the beginning standing dc, ch1, slst to standing dc
[4 V-st, 8FPdc, 4 2dc-V-st]
Round 12:
Slst in next FPdc, FPslst around the same FPdc, Standing dc <Note: this will give you a FPdc look at the beginning of your round & counts as first FPdc>,
*3dc-V-st in 2dc-V-st, FPdc around FPdc, ch1, skp V-st, FPdc around FPdc,
Rpt from * until last FPdc, FPdc around FPdc, ch1, slst to beginning standing dc
[4 3dc-V-st, 4 ch1 spc]
Round 13:
FPslst around the standing dc of last round, Standing dc (this will give you the FPdc look at the beginning of the round),
*3dc-V-st in 3dc-V-st, FPdc around FPdc, ch1, FPdc around FPdc,
Rpt from * until last FPdc, FPdc around FPdc, ch1, slst to beginning standing dc
[4 3dc-V-st, 8FPdc, 4 ch1 spc]
Round 14:
Repeat Round 10
Rounds 15-20:
Repeat Rounds 9-14
Lower Forearm (Decreases in pattern stitch)
Round 21: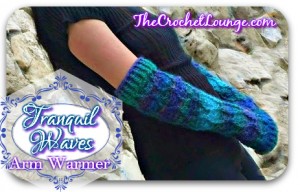
Standing dc, dc in same ch1 spc as the slst join <Note: This is half of a 2dc-V-st>,
*FPdc around FPdc, ch1, skp V-st, FPdc around FPdc, 2dc-V-st in 2dc-V-st
Rpt from * until last FPdc, FPdc around FPdc, 2dc in same ch1 spc worked as the beginning standing dc, ch1, slst join to standing dc
[4 2dc-V-st, 8 FPdc, 4 ch1 spc]
Round 22:
Standing dc, dc in same ch1 spc as the slst join <Note: This is half of a 2dc-V-st>,
*FPdc around FPdc, ch1, FPdc around FPdc, 2dc-V-st in 2dc-V-st
Rpt from * until last FPdc, FPdc around FPdc, 2dc in same ch1 spc worked as the beginning standing dc, ch1, slst join to standing dc
[4 2dc-V-st, 8 FPdc, 4 ch1 spc]
Round 23:
Standing dc <Note: This is half of a V-st>,
*FPdc around FPdc, 2dc-V-st in next ch1 spc, FPdc around FPdc, V-st in 2dc-V-st,
Rpt from * until last FPdc, FPdc around FPdc, dc in same ch1 spc worked as the beginning standing dc, ch1, slst to standing dc
[4 V-st, 8FPdc, 4 2dc-V-st]
Round 24:
Slst in next FPdc, FPslst around the same FPdc, Standing dc,
*2dc-V-st in 2dc-V-st, FPdc around FPdc, ch1, skp V-st, FPdc around FPdc,
Rpt from * until last FPdc, FPdc around FPdc, ch1, slst to beginning standing dc
[4 2dc-V-st, 8FPdc, 4 ch1 spc]
Round 25:
FPslst around the standing dc of last round, Standing dc (this will give you the FPdc look at the beginning of the round),
*2dc-V-st in 2dc-V-st, FPdc around FPdc, ch1, FPdc around FPdc,
Rpt from * until last FPdc, FPdc around FPdc, ch1, slst to beginning standing dc
[4 3dc-V-st, 8FPdc, 4 ch1 spc]
Round 26:
Standing dc, dc in same ch1 spc as the slst join <Note: This is half of a 2dc-V-st>,
*FPdc around FPdc, ch1, FPdc around FPdc, 2dc-V-st in 2dc-V-st
Rpt from * until last FPdc, FPdc around FPdc, 3dc in same ch1 spc worked as the standing dc, ch1, slst to standing dc
[4 3dc-V-st, 8 FPdc, 4 ch1 spc]
Rounds 27-32:
Repeat Rounds 21-26
Rounds 33-35:
Repeat Rounds 21-23
Round 36 (thumb hole):
Slst in next FPdc, FPslst around the same FPdc, Standing tr or ch4
<Note: This is the beginning FPtr of the round and is the thumb hole area>,
*2dc-V-st in 2dc-V-st, FPdc around FPdc, ch1, skp V-st, FPdc around FPdc,
Rpt from * until last FPdc, FPtr around FPdc, ch5, slst to beginning standing dc
[4 2dc-V-st, 6 FPdc, 2 FPtr, 3 ch1 spc, 1 ch5 spc]
Round 37:
FPslst around the standing tr or ch4 of last round, Standing dc,
*2dc-V-st in 2dc-V-st, FPdc around FPdc, ch1, FPdc around FPdc,
Rpt from * until FPtr remains, FPdc around FPtr, ch1, slst to beginning standing dc
[4 3dc-V-st, 8FPdc, 4 ch1 spc]
Round 38:
Repeat Round 26
Hand Ribbing
Round 39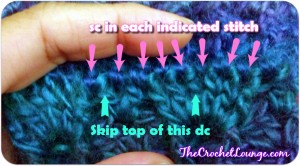
Ch1, sc in same ch1 spc, skp next dc, sc in next dc, sc in next FPdc, sc in next dc, sc in ch1 spc of v-st, skp next dc, sc in next FPdc, sc in next dc, sc in next dc,
*sc in ch1 spc, skp next dc, sc in next dc, sc in next FPdc, sc in next dc, sc in ch1 spc of v-st, skp next dc, sc in next FPdc, sc in next dc, sc in next dc,
Rpt from *, slst to beginning sc
[32 sc]
Round 40
Ch1, *BPhdc around next post, FPhdc around next post,
Rpt from *, slst to beginning ch1
<Note: The last FPhdc goes around the post where the first and last fsc is joined together. If you do not sew in the beginning tail to the last fsc before starting Row 1, it may look like there are 2 posts remaining.>
[16 BPhdc, 16 FPhdc]
Round 41
<Note: If you find it difficult to start without a ch1, go ahead and make a ch1, otherwise, you can actually go straight into the post stitches>
*BPhdc around BPhdc, FPhdc around FPhdc
Rpt from *, slst join to beginning BPhdc
[16 BPhdc, 16 FPhdc]
Round 42
Repeat Roound 41
[16 BPhdc, 16 FPhdc]
Finishing
Round 43
Reverse sc (crab stitch) around, cut yarn
Weave in Ends
Come share your finished arm warmers because you can inspire someone else! ♥ The Crochet Lounge Fan Page on facebook or The Crochet Lounge G+
Feb 022014
Mariposas y Angeles Lace Beanie
Disclaimer: This post contains affiliate links

Join hundreds of thousands of Loungers around the world on social media via one (or many) of these buttons.
♥ ![]()
![]()
![]()
![]()
![]() ♥
♥
When the Mariposas Beanie was created, I knew I would create a top down version simply because hats from the top-down are my love and favorite. It hasn’t proven to be congruent with my hat pattern writing because the stitch pattern I want to create happens to be bottom up 😀 With the Mariposas series, though, there is huge potential in both directions as you can see in the boot cuffs, wrist cuffs and (the unseen bolero), so I knew this free crochet pattern was going to be born at a later date.
While the Mariposas Boot Cuffs pattern was in testing, I already knew the series was going to include a scarf, infinity scarf, cowl, Mariposas Beanie, Mariposas Wrist Cuffs as well as a potential shawl, poncho, and lacy baby blanket, throw, afghan sizes. It’s just a matter of WHICH pattern came next — but you all know this well, many a WIPs, right?  The latest scarf prototype being worked up seems to float my boat, so if the embellishments pan out, that shall come next in this series.
This all stemmed from the Mariposas Bolero pattern back in August that has yet to be fully tested and released — the bolero is sized XS - 5XL. If you feel so inclined to make a matching bolero, please contact me via facebook or e-mail [email protected]
Materials
- Worsted Weight yarn - Featured in Red Heart With Love
- Size J hook
- Solid colors really show off the stitch - also great for slow variegated yarns if you want the stitch pronounced
Gauge
8 Stitches & 6 Rows of FPhdc, BPhdc = 2 inches
Height of dc - 3/4″ or 1.905cm
Height of tr - 1″ or 2.54cm
<Note: It is important that gauge be matched on a fitted item such as a beanie! Watch your Golden Loop>
Golden Loop - after inserting your hook into an indicated stitch, the Golden Loop is the loop you yarn over and draw up. The height of your row/round depends on how high you draw up the Golden Loop. This matters greatly in gauge matching if you are needing to follow hook size and or have already dropped down in hook size and cannot obtain gauge.
If your golden loop is much longer, you will simply end up with a slouch hat, and you can fold up the brim for a 2-in-1 beanie/slouch. If you work it up as a beanie, it can fit an 18mo toddler if brim is folded up, or an adult with the beanie as is.
Stitches Used
fsc, ch, sc, slst, dc, tr, V-st, 3dc-Fan, 7dc-Fan, 9tr-Fan
Foundation single crochet (fsc) – ch2, insert hook into 2nd chain from hook, yo draw up a loop, yo draw through 1 (this creates the next foundation chain), yo draw through 2 (this completes the single crochet)
*insert hook into the next foundation chain just created, yo draw up a loop, yo draw through 1, yo draw through 2
Repeat from * until total fsc completed
Yarn over (yo) – wrap yarn over hook
Chain (ch) - yo (yarn over), pull through loop on hook
Single crochet (sc) - insert hook in indicated stitch, yo draw up a loop, yo draw through 2
Single crochet 2 together (sc2tog) - insert hook in indicated stitch, yo draw up a loop, insert hook in next stitch, yo draw up a loop, yo draw through 3 loops on hook
Slip Stitch (slst) - insert hook in indicated stitch, yo draw through stitch as well as the loop on hook
Half double crochet (hdc) - yo, insert hook in indicated stitch, yo draw up a loop, yo draw through all 3 loops on hook
Front Post hdc (FPhdc) - yo, insert hook from front to back to front from the right side around to the left side of the indicated post (Lefties do the opposite from left to right), yo draw up a loop, yo draw through all 3 loops on hook
Back Post hdc (BPhdc) – yo, insert hook from back to front to back from the right side around to the left side of the indicated post (Lefties do the opposite from left to right), yo draw up a loop, yo draw through all 3 loops on hook
Double Crochet (dc) – yo, insert hook in indicated st (stitch), yo draw up a loop (3 loops on hook), yo draw through 2 loops, yo draw through 2 loops (1 loop on hook)
Double Crochet 2 together (dc2tog) – yo, insert hook in first indicated st (stitch), yo draw up a loop (3 loops on hook), yo draw through 2 loops, yo insert hook in second indicated st, yo draw up a loop(4loops on hook), yo draw through 2 loops (3 loops on hook), yo draw through remaining 3 loops on hook <Note: You are basically doing half of a dc in the first stitch, then half of a dc in the next stitch before finishing the two dc at the same time in the last yo draw through remaining loops on hook>
Special Stitches
Magic Circle The Crochet Lounge™ way -
Chainless Starting Double Crochet (Standing dc) -
V-Stitch (V-st) - (dc, ch2, dc) in indicated stitch
V1-Stitch (V1-st) - (dc, ch1, dc) in indicated stitch <Note: This is used in rounds 12 to 15>
3dc-Fan - 3dc in indicated stitch
7dc-Fan - 7dc in indicated stitch
9tr-Fan - 9tr in indicated stitch
V-St in V-St - V-St in next V-St
V1-St in V1-St - V1-St in next V1-St
V-st in 3dc-Fan - V-st in middle dc of 3dc-Fan
V1-st in 7dc-Fan - V1-st in 4th dc of 7dc-Fan (center dc of the 7dc-Fan)
7dc-Fan in V-st - 7dc in ch2 spc of indicated V-st
9tr-Fan in V-st - 9tr in ch2 spc of indicated V-st
V-st in 9tr-Fan - V-st in 5th tr of 9tr-Fan (center tr of the 9tr-Fan)
Invisible sc Join The Crochet Lounge™ Way – in the last stitch of the round, insert hook into the last stitch, draw up a loop, insert hook into the back loop only (blo) of the first stitch in the round, yo, draw up and through the loops on hook, leave a 6” tail, cut the yarn. Insert hook through both loops of the second stitch of the round, yo with tail draw yarn through. Insert hook into the front loop only (flo) of the last stitch of the round, draw tail through. From wrong side of piece, insert hook through the same last stitch in the round under both loops, draw tail to the inside and fasten off
Pattern
Magic Circle
<Note: You can replace the magic circle with ch4 slst to 4th ch from hook to join. This generally creates a larger gap/hole in the center.>
Round 1
Standing double crochet (or ch3), ch1, *dc in magic circle, ch1,
Rpt from * 5 more times, slst join to standing double crochet (or third ch of beginning ch3)
[7 dc, 7 ch1 spc]
<Note: The standing double crochet gives a cleaner look and eliminates being able to see the start of the rounds.>
Round 2
Standing double crochet (or ch3), ch1, *V1-St in next ch1 spc, ch1
Rpt from * 5 more times, dc in next ch1 spc, ch1, slst join to standing double crochet (or third ch of beginning ch3)
[7 V1-st, 7 ch1 spc between V1-st]
Round 3
Standing dc (or ch3), ch1, *2dc in next ch1 spc, ch1,
Rpt from * 12 more times, dc in next ch1 spc, slst join to standing dc (or third ch of beginning ch3)
[14 2dc-sets]
<Note: Standing dc at the beginning of the round counts as the second dc in one of the 14 2dc-sets>
Round 4
Standing dc (or ch3), 3dc in spc between next 2dc-set, *V1-st in spc between next 2dc-set, 3dc in spc between next 2dc set
Rpt from * 5 more times, dc in next ch1 spc, ch1, slst join to standing dc (or third ch of beginning ch3)
<Note: All stitches in this round is worked in the space between each of the 2dc-sets (between the posts). Ending dc, ch1, slst to Standing dc counts as a V1-st>
[7 V1-st, 7 3dc-Fan]
Round 5
Standing dc (or ch3), ch1, V-st in 3dc-Fan, ch1, *V-st in V1-st, ch1, V-st in 3dc-Fan, ch1,
Rpt from * 5 more times, dc in next V1-st, ch2, slst join to standing dc (or third ch of beginning ch3)
<Note: We have switched to regular V-st in this round. Are you paying attention? 😉 At this point, you can still press the circle flat, but it may have a very slight curve and that’s okay. last dc, ch2, slst to standing dc counts as a V-st>
[14 V-st]
Round 6
Slst to the ch2 spc of the next V-st, standing dc (or ch3), 6dc in same ch2 spc, V-st in next V-st, *7dc in next V-st, V-st in next V-st,
Rpt from * 5 more times, slst join to standing dc (or third ch of beginning ch3)
<Note: Standing dc, 6dc in same ch2 spc at the beginning of the round counts as the first 7dc-Fan.>
[7 V-st, 7 7dc-Fan]
Round 7
Slst in next 3 dc, standing dc (or ch3), ch2, dc in same dc, ch2, V-st in next V-st, *V-st in next 7dc-Fan, ch2, V-st in next V-st, ch2,
Rpt from * 5 more times, slst join to standing dc (or third ch of beginning ch3)
<Note: Beginning of the round starts in the center of 7dc-Fan of previous round and Standing dc, ch2, dc in same st start counts as the first V-st.>
[14 V-st]
Round 8
Slst into ch2 spc, standing dc(or ch3), ch2, dc in same ch2 spc, 9tr in next V-st, * V-st in V-st, 9tr-Fan in next V-st,
Rpt from *5 more times, slst join to standing dc (or third ch of beginning ch3)
<Note: Standing dc, ch2, dc in same ch2 spc at the beginning of the round counts as the first V-st>
[7 V-st, 7 9tr-Fan]
Round 9
Slst into ch2 spc, standing dc (or ch3), ch2, dc in same ch2 spc, ch2, V-st in next 9tr-Fan, *V-st in V-st, ch2, V-st in next 9tr-Fan, ch2,
Rpt from * 5 more times, slst join to standing dc (or third ch of beginning ch3)
<Note: Standing dc, ch2, dc in same st start counts as the first V-st>
[14 V-st]
Round 10
Slst into ch2 spc, ch4, 8tr in same ch2 spc, V-st in V-st, *9tr-Fan in next V-st, V-st in V-st,
Rpt from * 5 more times, slst join to 4th ch of beginning ch4
<Note: ch4 at beginning of the round counts as the first tr in 9tr-Fan>
[7 V-st, 7 9tr-Fan]
Round 11
Slst in next 4st to center of 9tr-Fan, standing dc (or ch3), ch2, dc in same tr, ch2, V-st in V-st, *V-st in 9tr-Fan, ch2, V-st in V-st, ch2,
Rpt from * 5 more times, slst join to standing dc (or third ch of beginning ch3)
<Note: Standing dc, ch2, dc in same tr at beginning of round counts as V-st.>
[14 V-st]
Round 12
Slst into ch2 spc of V-st, ch1, 2sc in same ch2 spc, 3sc in next ch2 spc, *2sc in V-st, 3sc in next ch2 spc,
Rpt from * 12 more times, slst to beginning sc
<Note: >
[70 sc]
Round 13
Ch1, *BPhdc in first 2 sc posts, FPhdc in next 3 sc posts,
Rpt from * 13 more times, slst join to beginning BPhdc
<Note: You are working 2BPhdc in each V-st section and 3FPhdc in the space between the V-st from Round 11.>
[28 BPhdc, 42FPhdc]
Round 14
Ch1, BPhdc in each BPhdc, FPhdc in each FPhdc throughout the round, slst join to beginning BPhdc
<Note: You are crocheting same stitch type into the same stitch from Round 13>
[28 BPhdc, 42FPhdc]
Round 15
Ch1, FPhdc in each BPhdc, BPhdc in each FPhdc throughout the round, slst join to beginning FPhdc
<Note: You are now creating the basket weave look by crocheting the opposite post stitch as the previous round>
[42 BPhdc, 28FPhdc]
Round 16
Ch1, FPhdc in each FPhdc, BPhdc in each BPhdc throughout the round, slst join to beginning FPhdc
<Note: You are crocheting same stitch type into the same stitch from Round 15>
[42 BPhdc, 28FPhdc]
Round 17
Ch1, BPhdc in each FPhdc, FPhdc in each BPhdc throughout the round, slst join to beginning BPhdc
<Note: You are switching to the opposite post stitch in this round to finish the last set of basket weave>
[28 BPhdc, 42FPhdc]
Round 18
Rpt Round 14
<Note: You are crocheting same stitch type into the same stitch from Round 17>
[28 BPhdc, 42FPhdc]
Weave in ends
I have seen some fantastic surface slip stitch work done at the brim portion highlighting the brim section — it can completely change your beanie style if you change the color of the brim and then frame it. Try it, have a blast and come share with us what you’ve made
♥ ![]()
![]()
![]()
![]()
![]() ♥
♥
Ravelry Link to come soon:

Ravel This!
Dec 272013
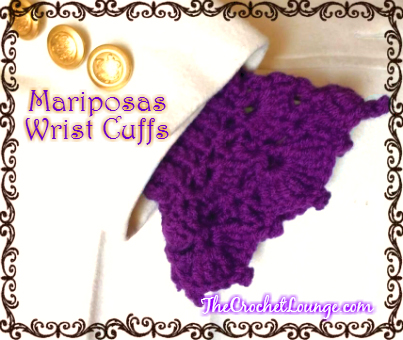
Mariposas Wrist Cuffs - Free Crochet Pattern
Disclaimer: This post contains affiliate links
Join me and thousands of Loungers around the world on social media via one (or many) of these buttons.
♥ ![]()
![]()
![]()
![]()
![]() ♥
♥
After the Mariposas Boot Cuffs pattern debut, I knew there was going to be a matching Mariposas Beanie, wrist cuffs, and some form of neck wear to come in a short time-frame, and I was right. I prefer to be inspired to hook by the hooks and yarn vs. under pressure - because I strongly believe that the energy of a person while creating ANYTHING will go into their final product whether it be their designs, their finished object, etc. and will be felt by others who are on the receiving end.
The force is strong with this stitch pattern 😉 Although the bolero has yet to make its way through the testing stages, its companions are moving along quickly. Wrist cuffs have been on my list to ‘tackle’ since last year and when I finally was inspired to create these, I fell in love with the end product before they were hooked.
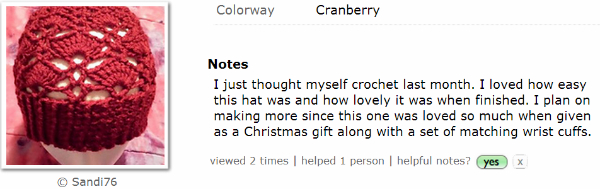
I was truly inspired when I went to Ravelry today and saw a note on Sandi76’s Mariposas Beanie (♥) that she’d only been crocheting FOR A MONTH. She pattern tested the Mariposas Beanie and her stitching was impeccable. If she can pattern test the written pattern, you can make this set of wrist cuffs/boot cuffs/beanie!
Materials
- Worsted Weight yarn - Featured in Red Heart With Love 1 skein (enough to make wrist cuffs and a Mariposas Beanie with left over)
- Any Size Hook to Obtain Gauge (I used a G/6 4.5mm hook)
- Solid colors really show off the stitch - also great for slow variegated yarns if you want the stitch pronounced
Stitches Used
fsc, ch, sc, slst, dc, tr, V-st, 7dc-Fan
Foundation single crochet (fsc) – ch2, insert hook into 2nd chain from hook, yo draw up a loop, yo draw through 1 (this creates the next foundation
chain), yo draw through 2 (this completes the single crochet)
*insert hook into the next foundation chain just created, yo draw up a loop, yo draw through 1, yo draw through 2
Repeat from * until total fsc completed
Yarn over (yo) – wrap yarn over hook
Chain (ch) - yo (yarn over), pull through loop on hook
Single crochet (sc) - insert hook in indicated stitch, yo draw up a loop, yo draw through 2
Slip Stitch (slst) - insert hook in indicated stitch, yo draw through stitch as well as the loop on hook
Half double crochet (hdc) - yo, insert hook in indicated stitch, yo draw up a loop, yo draw through all 3 loops on hook
Front Post hdc (FPhdc) - yo, insert hook from front to back to front from the right side around to the left side of the indicated post (Lefties do the opposite
Back Post hdc (BPhdc) – yo, insert hook from back to front to back from the right side around to the left side of the indicated post (Lefties do the opposite from left to right), yo draw up a loop, yo draw through all 3 loops on hook from left to right), yo draw up a loop, yo draw through all 3 loops on hook
Double Crochet (dc) – yo, insert hook in indicated st (stitch), yo draw up a loop (3 loops on hook), yo draw through 2 loops, yo draw through 2 loops (1 loop on hook)
Treble Crochet (tr) – yo 2 times, insert hook in indicated st (stitch), yo draw up a loop (4 loops on hook), yo draw through 2 loops (3 loops on hook), yo draw through 2 loops (2 loops on hook), yo draw through remaining 2 loops on hook
Special Stitches
Chainless Starting Double Crochet (Standing dc) -
V-Stitch (V-st) - (dc, ch2, dc) in indicated stitch
7dc-Fan - 7dc in indicated stitch
7dc in V-st - 7dc in ch2 spc of indicated V-st
9tr-Fan in V-st - 9tr in ch2 spc of indicated V-st
V-st in 7dc-Fan - V-st in 3rd dc of 7dc-Fan (center dc of the 7dc-Fan)
V-st in V-st - V-st in ch2 spc of indicated V-st
Picot - sc, ch3, slst in the sc just made at the beginning of the picot
Gauge
10 Stitches & 7 Rounds of ribbing in FPhdc, BPhdc + fsc = 2 inches
Height of dc - 5/8″ or 1.5875cm
Height of tr - 1″ or 2.54cm
<Note: It is okay to have a longer golden loop, which creates a higher stitch, but it will also make your cuff longer, so pay attention!>
Measurements
Cuff ribbing 6″ circumference by 2″ height - will stretch to average wrist size (If this feels snug for you, please feel free to up-size the hook you are using for the ribbing portion! Same goes if you need a smaller size ribbing section, downsize the hook for that portion of the pattern.)
Total height from base of fsc to tip of picot on top of 9tr-Fan is 4.75″ or 12.065cm
Golden Loop - after inserting your hook into an indicated stitch, the Golden Loop is the loop you yarn over and draw up. The height of your row/round depends on how high you draw up the Golden Loop. This matters greatly in gauge matching if you are needing to follow hook size and or have already dropped down in hook size and cannot obtain gauge.
Pattern
Cuff Ribbing
fsc 30, slst join to the first fsc being careful not to twist when you join
<Note: When joining fsc in the round, you must also sew the initial tail to the last stitch to form the full circle.
* You can also replace this with Ch30, slst join to the first ch, being careful not to twist when you join, ch1, sc in same st, sc in each ch around, slst to first sc.
* fsc is fantastic to learn because it provides a stretchier fabric vs. the rigid chain start when done>
Cuff Mariposas Lace Flare
Round 1
Ch1,
*BPhdc in next st, FPhdc in next st,
Rpt from *, slst join to first BPhdc
<Note: the last FPhdc goes around the joining st of the prev round and will cover over the beginning ch1 after join>
[15 FPhdc, 15 BPhdc]
Round 2
Ch1, BPhdc in BPhdc from slst join, FPhdc in FPhdc,
*BPhdc in BPhdc, FPhdc in FPhdc,
Rpt from *, slst join to first BPhdc
<Note: the last FPhdc goes around the joining st of the prev round and will cover over the beginning ch1 after join>
[15 FPhdc, 15 BPhdc]
Rounds 3-7 Rpt Round 2
[15 FPhdc, 15 BPhdc]
Round 8
Standing dc, ch2, dc into joining st of the prev round, skp 2 st,
*V-st in next st, skp 2 st,
Rpt from *, slst join to standing dc
<Note: Standing dc, ch2, dc at the beginning of the round counts as the first V-st>
[10 V-st]
Round 9
Slst into ch2 spc,
Standing dc, 6dc in same ch2 spc, V-st in next V-st,
*7dc-Fan in next V-st, V-st in next V-st,
Rpt from *,
Slst join to Standing dc
<Note: Standing dc plus 6dc counts as the first 7dc-Fan>
[5 V-st, 5 7dc-Fan]
Round 10
Slst in next 3 dc,
Standing dc, ch2, dc in same st as standing dc, ch2, V-st in next V-st, ch2,
*V-st in next 7dc-Fan, ch2, V-st in next V-st, ch2,
Rpt from *,
Slst join to standing dc
<Note: Beginning of the round starts in the center dc of 7dc-Fan in previous round and beginning Standing dc, ch2 dc in same st counts as the first V-st>
[10 V-st]

Round 11
Slst into ch2 spc,
Standing dc, ch2, dc in same V-st, 9tr-Fan in next V-st,
*V-st in next V-st, 9tr-Fan in next V-st,
Rpt from *,
Slst join to standing dc
<Note: Standing dc, ch2, dc at the beginning of the round counts as the first V-st>
[5 V-st, 5 9tr-Fan]
Round 12
Picot into ch2 spc,
Slst in next 4 tr, picot in next tr, slst in next 4 tr,
*Picot in next V-st, slst in next 4tr, picot in next tr, slst in next 4tr
Rpt from *,
Slst join to sc of beginning picot, cut 6″ tail
<Note: Beginning of the round starts in the center of a V-st of previous round and no stitches are worked in the dc portions of the V-st — you are only working in the ch2 spc of the V-st plus each tr of the 9tr-Fan in this round>
[5 Picots in V-st, 5 Picots in 9tr-Fan]
Weave in ends
Make a second because you may want a matching cuff! 😉 You can wear them right side out and out of a jacket sleeve, or turn them inside out, so you can fold it up over a sweater or blouse and still have the right side of the stitches showing for a great look. ♥
Jul 162013
The Summer Elegance Edition
Pineapple Lace Market Bag

I promised a Pineapple Lace blitz and here is the Pineapple Lace Market Bag pattern! If you connect with me on facebook, you would have seen the previews of the lovely Market Bag some of the pattern testers have made.
Did you miss the debut pattern in The Summer Elegance Edition series? It’s the matching Pineapple Lace Sunhat shown in this photo.
Let you in on a little secret… The LESS tails I have to tuck, crochet over and weave, the more EXCITED I am! With that little piece of information in hand, this entire Market Bag pattern including both straps utilizing Option 1 Straps is done in a SINGLE PIECE.
It’s my first bag design pattern and I am absolutely thrilled! Who knew crocheting a bag could be so much fun? 😀 Since I rarely carry purses, and carry a mini wrist bag for diapers, a bag of this size was quite exciting to play with.
It’s time to Go Green!
If you shop at the local farmer’s market or at a regular grocery store, this is a fabulous way to show off your hooking talent AND put it to good use. Your finished object will be ever so loved for a long time to come 😀
Ideas for the bag:
- Line it with fabric
- Use as a medium sized tote for the gym, the pool, the beach, swimming lessons, ball games, actual market going (after all, it IS a market bag), artisan breads, fruits (fit 12 nice sized fuji apples with room for a few more), extra clothing, etc.
- YARN TOTE - with the pineapple lace, it is PERFECT to feed project yarn through and run a few colors at the same time
- You can fit two 14oz balls of ww cotton, PLUS 2-3 skeins of 2oz ww cotton stacked on top
- or
- 12-15 skeins of 2-2.5oz ww cotton
- As you use up the yarn, your WIP (work in progress) will surely fit neatly into the empty space created if properly rolled/folded. 😛
Don’t hesitate to visit me on Facebook if you have any pattern specific or crochet related questions! The Loungers are fabulously helpful even if I may not have all the answers ♥
Materials
- 5oz Worsted Weight - Medium #4 (UK Aran, AU 10ply) ~250yds
- Photo done in Sugar n Cream/Bernat Handicrafter Cotton/Peaches and Creme - can use Lion Brand Lion Cotton or Lion Brand Kitchen Cotton
- <Note: Caron Simply Soft is thinner than regular worsted weight even though it is marked as ww>
- I-9 (5.5mm) Hook or Hook Size to Obtain Gauge (While gauge is provided on this piece, it doesn’t really matter because it is not a fitted garment or accessory)
- Tapestry Needle
Sizing
One Size
Gauge
2” after first 2 rounds - not a big concern since it is a market bag
Stitches (sts) & Abbreviations
Magic Circle The Crochet Lounge Way - wrap yarn around finger twice clockwise onto your finger on the left hand (counter-clockwise on the right-hand for the lefties), insert hook into the center of the circle, yo draw up a loop ch1 tightly to close.
Yarn over (yo) – wrap yarn over hook
Chain (ch) – yo, pull through loop on hook
Foundation single crochet (fsc) – ch2, insert hook into 2nd chain from hook, yo draw up a loop, yo draw through 1 (this creates the next foundation chain), yo draw through 2 (this completes the single crochet)
*insert hook into the foundation chain just created, yo draw up a loop, yo draw through 1, yo draw through 2
Repeat from * until total fsc completed
Slip Stitch (slst) - insert hook in indicated stitch, yo draw through stitch and loop on hook
Single crochet (sc) - insert hook in indicated stitch, yo draw up a loop, yo draw through 2
Half double crochet (hdc) - yo, insert hook in indicated stitch, yo draw up a loop, yo draw through all 3 loops on hook
Back Post hdc (BPhdc) – yo, insert hook from back to front to back from the right side around to the left side of the indicated post (Lefties do the opposite from left to right), yo draw up a loop, yo draw through all 3 loops on hook
BPhdc 2 together (BPhdc2tog) - yo insert hook from behind the work around the post from right to left, yo draw up a loop, yo insert hook from behind the work around the next post from right to left, yo draw up a loop, yo draw through all 5 loops
Puff stitch - (yo, insert hook in indicated stitch, yo draw up a loop) 4 times, yo draw through all loops on hook
Modified puff stitch - (yo, insert hook in indicated stitch, yo draw up a loop) 4 times, yo draw through 8 loops on hook [leaving 2 on hook], yo draw through 2 loops
Puff shell – (puff stitch, ch1, puff stitch) in the indicated stitch
Modified puff shell – (puff stitch, ch1, modified puff stitch) in the indicated stitch
Special Stitches Defined:
3dc Shell - 3dc in indicated stitch
V-Shell – (2dc, ch1, 2dc) in indicated stitch
5dc-Fan – 5dc in indicated stitch
6dc-Fan — 6dc in indicated stitch
5dc-Fan in V-Shell – 5dc in ch1 spc of indicated V-Shell
V-Shell in V-Shell – V-Shell in ch1 spc of indicated V-Shell
6dc-Fan in 5dc-Fan – 6dc-Fan in center dc of 5dc-Fan of previous round
Modified Foundation single crochet (mfsc) – insert hook into indicated stitch, yo draw up a loop, yo draw through 1 (this creates the next foundation chain), yo draw through 2 (this completes the single crochet)
*insert hook into the foundation chain just created, yo draw up a loop, yo draw through 1, yo draw through 2
Repeat from * until total # mfsc completed
Invisible sc Join The Crochet Lounge Way – in the last stitch of the round, insert hook into the last stitch, draw up a loop, insert hook into the back loop only (blo) of the first stitch in the round, yo, draw up and through the loops on hook, leave a 6” tail, cut the yarn. Insert hook through both loops of the second stitch of the round, yo with tail draw yarn through. Insert hook into the front loop only (flo) of the last stitch of the round, draw tail through. From wrong side of piece, insert hook through the same last stitch in the round under both loops, draw tail to the inside and fasten off.

The entire market bag including Option 1 straps and slst finish around the rim and straps is worked as a SINGLE PIECE - do not break yarn between sections of the bag. If you are working Option 2 permanent strap, then break yarn where suggested.
Magic Circle
Round 1
12dc into the Magic Circle
[12dc]
Round 2
Ch2, 2dc in each dc around, slst join to the first dc of the round
[24dc]
Round 3
Ch2, 3dc in same st, skp next dc,
*3dc in next dc, skp next dc,
Rpt from * 10 times,
Slst join to the first dc of the round
[36dc or 12 3dc-shell]
Round 4
Slst in next st , ch2, V-Shell in same spc
*V-Shell in center of next 3dc-shell,
Rpt from * 10 times,
Slst join to the first dc of the round
[12ch1 spc + 48dc or 12 V-Shell]
Round 5
Slst in next 2 st (to ch1 spc of V-shell), ch2, 5dc in same spc,
*5dc-fan in next V-Shell,
Rpt from * 10 times,
Slst join to the first dc of the round
[12 5dc-fan or 60dc]
Round 6
Slst in next 2 st (to center of 5dc-fan), ch2, 6dc-fan in same dc
*6dc-fan in next 5dc-fan of Round 5,
Rpt from * 10 times,
Slst join to the first dc of the round
[12 6dc-fan or 72dc]
Round 7
Ch2, dc in each dc around, slst join to the first dc of the round
[72dc]
Round 8
Ch2, V-Shell in same spc,
Ch2, skp 3dc, dc in next dc,
Ch2, skp 3dc, V-Shell in next dc,
Ch2, skp 3dc, (sc in next dc, ch5, skp next dc) 4 times, sc in next dc,
Ch2,
*Skp 3dc, V-Shell in the next dc,
Ch2, skp 3dc, dc in next dc,
Ch2, skp 3dc, V-Shell in next dc,
Ch2, skp 3dc, (sc in next dc, ch5, skp next dc) 4 times, sc in next dc,
Ch2,
Rpt from *,
Slst join to the first dc of the round
[Total 3 sets repeated]
Round 9
Slst in next 2 st (to ch1 spc of V-Shell), ch2, V-Shell in same spc,
Ch2, 3dc in next dc,
Ch2, V-Shell in V-Shell,
Ch2, (sc in next ch5 spc, ch5) 3 times, sc in next ch5 spc,
Ch2,
*V-Shell in V-Shell,
Ch2, 3dc in next dc,
Ch2, V-Shell in V-Shell,
Ch2, (sc in next ch5 spc, ch5) 3 times, sc in next ch5 spc,
Ch2,
Rpt from *
Slst join to the first dc of the round
[Total 3 sets repeated]
Round 10
Slst in next 2 st (to ch1 spc of V-Shell),
Ch2, V-Shell in same spc,
Ch2, (2dc in next dc) 3 times,
Ch2, V-Shell in V-Shell,
Ch2, (sc in next ch5 spc, ch5) 2 times, sc in next ch5 spc,
Ch2,
*V-Shell in V-Shell,
Ch2, (2dc in next dc) 3 times,
Ch2, V-Shell in V-Shell,
Ch2, (sc in next ch5 spc, ch5) 2 times, sc in next ch5 spc,
Ch2,
Rpt from *,
Slst join to the first dc of the round
Round 11
Slst in next 2 st (to ch1 spc of V-Shell),
Ch2, V-Shell in same spc,
Ch2, (dc in next dc, ch1) 5 times, dc in next dc,
Ch2, V-Shell in V-Shell,
Ch2, sc in next ch5 spc, ch5, sc in next ch5 spc,
Ch2,
*V-Shell in V-Shell,
Ch2, (dc in next dc, ch1) 5 times, dc in next dc,
Ch2, V-Shell in V-Shell,
Ch2, sc in next ch5 spc, ch5, sc in next ch5 spc,
Ch2,
Rpt from *,
Slst join to the first dc of the round
Round 12
Slst in next 2 st (to ch1 spc of V-Shell),
Ch2, V-Shell in same spc,
Ch2, (sc in next ch1 spc, ch5) 4 times, sc in next ch1 spc,
Ch2, V-Shell in V-Shell,
Ch2, dc in next ch5 spc,
Ch2,
*V-Shell in V-Shell,
Ch2, (sc in next ch1 spc, ch5) 4 times, sc in next ch1 spc,
Ch2, V-Shell in V-Shell,
Ch2, dc in next ch5 spc,
Ch2,
Rpt from *,
Slst join to the first dc of the round
Round 13
Slst in next 2 st (to ch1 spc of V-Shell),
Ch2, V-Shell in same V-Shell,
Ch2, (sc in next ch5 spc, ch5) 3 times, sc in next ch5 spc,
Ch2, V-Shell in V-Shell,
Ch2, 3dc in next dc, ch2,
*V-Shell in V-Shell,
Ch2, (sc in next ch5 spc, ch5) 3 times, sc in next ch5 spc,
Ch2, V-Shell in V-Shell,
Ch2, 3dc in next dc,
Ch2,
Rpt from *,
Slst join to the first dc of the round
Round 14
Slst in next 2 st (to ch1 spc of V-Shell),
Ch2, V-Shell in same spc,
Ch2, (sc in next ch5 spc, ch5) 2 times, sc in next ch5 spc,
Ch2, V-Shell in V-Shell,
Ch2, (2dc in next dc) 3 times,
Ch2,
*V-Shell in V-Shell,
Ch2, (sc in next ch5 spc, ch5) 2 times, sc in next ch5 spc,
Ch2, V-Shell in V-Shell,
Ch2, (2dc in next dc) 3 times,
Ch2,
Rpt from *,
Slst join to the first dc of the round
Round 15
Slst in next 2 st (to ch1 spc of V-Shell),
Ch2, V-Shell in same spc,
Ch2, sc in next ch5 spc, ch5, sc in next ch5 spc,
Ch2, V-Shell in V-Shell,
Ch2, (dc in next dc, ch1) 5 times, dc in next dc,
Ch2,
*V-Shell in V-Shell,
Ch2, sc in next ch5 spc, ch5, sc in next ch5 spc,
Ch2, V-Shell in V-Shell,
Ch2, (dc in next dc, ch1) 5 times, dc in next dc,
Ch2,
Rpt from *,
Slst join to the first dc of the round
Round 16
Ch2, V-Shell in same spc,
Ch2, dc in next ch5 spc,
Ch2, V-Shell in V-Shell,
Ch2, (skp next dc, sc in next ch1 spc, ch5) 4 times, skp next dc, sc in next ch1 spc,
Ch2,
*V-Shell in V-Shell,
Ch2, dc in next ch5 spc,
Ch2, V-Shell in V-Shell,
Ch2, (skp next dc, sc in next ch1 spc, ch5) 4 times, skp next dc, sc in next ch1 spc,
Ch2,
Rpt from *,
Slst join to the first dc of the round
[total 3 sets repeated]
Rounds 17-23
Repeat Rounds 9-15
Do Not Break Yarn

Bag Rim
Round 24
Ch1, hdc in same spc, sc in next dc, sc in ch1 spc, sc in next dc, hdc in last dc of V-Shell,
Ch2, hdc in ch5 spc,
Ch2, hdc in first dc, sc in next dc, sc in ch1 spc, sc in next dc, hdc in last dc of V-Shell,
Ch2, (skp next dc, sc in next ch1 spc, ch1) 4 times, skp next dc, sc in next ch1 spc,
Ch2,
* hdc in first dc, sc in next dc, sc in ch1 spc, sc in next dc, hdc in last dc of V-Shell,
Ch2, hdc in ch5 spc,
Ch2, hdc in first dc, sc in next dc, Sc in ch1 spc, sc in next dc, hdc in last dc of V-Shell,
Ch2, (skp next dc, sc in next ch1 spc, ch1) 4 times, skp next dc, sc in next ch1 spc,
Ch2,
Rpt from *,
Slst join to the first hdc of the round
[15hdc, 33sc, 12 ch1 spc, 12 ch2 spc]
Round 25
Ch1, sc in same spc, (sc in next sc) 3 times, sc in next hdc,
2sc in ch2 spc, sc in next hdc,
2sc in ch2 spc, sc in next hdc, (sc in next sc) 3 times, sc in next hdc,
2sc in ch2 spc, (sc in next sc, ch1) 5 times,
2sc in ch2 spc,
*sc in next hdc, (sc in next sc) 3 times, sc in next hdc,
2sc in ch2 spc, sc in next hdc,
2sc in ch2 spc, sc in next hdc, (sc in next sc) 3 times, sc in next hdc,
2sc in ch2 spc, (sc in next sc, ch1) 5 times,
2sc in ch2 spc,
Rpt from *,
Slst join to the first sc of the round
[72sc, 15 ch1 spc]
Rounds 26-29
Ch1, sc in each sc and sc in each ch1 spc around, slst join to the beginning sc
[87sc]
Bag Straps
Gauge
4sc or 4 rows to an inch - gauge pattern fsc 16, ch1, turn, sc in each sc across, repeat for 6 rows. (Gauge does not really matter in the straps, it is just used as a guide).
New Stitch for this section mfsc
Bag Straps Option 1 (shown in photo):
The Bag Straps are created with two strips on opposing sides of the bag and can be tied off depending on the length of the strap needed, thus creating an adjustable strap.
Continue along the rim:
Slst in the next 5 sts
Row 1
mfsc 50 starting in the same stitch as the last slst
Row 2
Ch1, turn (to be sure, you can follow the fsc down to make sure it is not twisted and that you will be working along the side that doubles back over the 5slst on the rim), sc in each sc across,
Slst join to the same st on the rim where you started the fsc,
Slst join to the next st on the rim
[50sc]
Row 3
Turn (without ch1, you are just going to turn the bag counter-clockwise for a righty and clockwise for a lefty. The yarn you crochet with will cross over in front, and that’s correct),
Do not chain,
Sc into each sc across, 2sc at the end of the row
[51sc]
Row 4
Ch1, turn
Sc in each sc across,
Slst to the same st on the rim where Row 2 started,
Slst to the next st on the rim
[51sc]
Rows 5-10
Repeat Row 2 & 3
[Rows 5-6 52sc
Rows 7-8 53sc
Rows 9-10 54sc]
Rim Continuation
Turn, Slst back up the strap you just formed
[54slst]
At the corner, sc in the same st as the last slst, sc across the short side of the strap
[10sc]
Slst in the same st as the last sc in the corner, slst down the other side of the strap
[50slst]
Slst in the next 44st
[34slst]
Strap 2
Row 1
mfsc 65 starting in the same stitch as the last slst
Row 2
Ch1, turn (to be sure, you can follow the fsc down to make sure it is not twisted and that you will be working along the side that doubles back over the last 10slst on the rim), sc in each sc across,
Slst join to the same st on the rim where you started the fsc,
Slst join to the next st on the rim
[65sc]
Row 3
Turn (without ch1, you are just going to turn the bag counter-clockwise for a righty and clockwise for a lefty. The yarn you crochet with will cross over in front, and that’s correct),
Do not chain,
Sc into each sc across, 2sc at the end of the row
[66sc]
Row 4
Ch1, turn
Sc in each sc across,
Slst to the same st on the rim where Row 2 started,
Slst to the next st on the rim
[66sc]
Rows 5-10
Repeat Row 2 & 3
[Rows 5-6 67sc
Rows 7-8 68sc
Rows 9-10 69sc]
Rim Completion
Turn, Slst back up the strap you just formed
[69slst]
At the corner, sc in the same st as the last slst, sc across the short side of the strap
[10sc]
Slst in the same st as the last sc in the corner, slst down the other side of the strap
[65slst]
Slst in the next 33st along the rim,
Invisible join to the bottom of the first strap.
[33slst]
Fasten Off
Weave in Ends
Bag Straps Option 2:
A permanent Bag Strap is created crocheting from one side to the opposing side of the bag as a single piece of fabric attached to both sides and cannot be adjusted after completion.
If you followed the strap gauging, then you can use the following numbers to determine how long you want your bag straps:
At 4st/in,
15” Strap = 60fsc
16” Strap = 64fsc
17” Strap = 68fsc
18” Strap = 72fsc
19” Strap = 76fsc
20” Strap = 80fsc
Slst in the next 5 sts, fsc (number you desire) starting in the same stitch as the last slst, keeping the fsc straight, count 34st along the rim continuing down the same direction as the 5 slst you have already made,
Slst into the 35th stitch,
Slst into the next stitch, turn,
Sc in each fsc,
*Slst to the last stitch worked on the rim,
Slst in the next st on the rim, turn,
Sc across
Repeat from * until you have a total of 10 rows including fsc,
Slst around the rim and over the strap, fasten off.
Attach yarn on the other side of the strap,
Slst around the rim and strap, fasten off.
Weave in Ends
![]()
Did you have fun? Would you like to see more lace hats? Connect with Me - I look forward to hearing from the Loungers ♥
 Always remember and never forget, you can always connect with me to show me what wonderful things you are hooking, ask me questions or simply come and say hello!
♥ ![]()
![]()
![]()
![]()
![]() ♥
♥
Pattern, photos, and post copyright Yi-An “e” Lee, The Crochet Lounge 2013. Please do not reproduce this pattern, instead, link this page to share with others.
Jul 102013
May Granny Squares
Of the Day (OTD), Of the Month (OTM) & On the Go (OTG)
Have you been following me on Pinterest? Have you been seeing all the beautiful 6″ and 12″ Squares/Block of the Day Picks by The Crochet Lounge on facebook or google+? Come Join Me!
Since I started to pin beautiful 6″ and 12″ crochet afghan granny squares towards the end of May, there has been a surge and interest in crocheting motif among the Loungers followed by the small ROAR on a recent poll whether or not I should continue with these wonderful pins. The conclusion is, not only should I pin and share on social media, they desperately needed a home here at TheCrochetLounge.com for those who are not linked in via social media.
Of the Month (OTM)
Hold your breath no more if you should ever get lost or miss a day’s Square of the Day Pin, you can always find your way back to the boards here! Simply click on the navigation tab “Of the Month (OTM)” at the top of the page and see all the posts that are “Of the Month” relevant. The frequency of these posts will be once a month after I catch up with May and June.
On the Go (OTG)
Are you out and about and simply NEED A QUICK pattern in a hurry that gives you just enough satisfaction and want a small motif project to take with? All you have to remember is “The Crochet Lounge On The Go” and you’ll be brought to these posts with links to the pin-boards that have your one click free pattern links. In due time, these will be more than just motif patterns and granny squares.
A Pinterest How To Guide - The Crochet Lounge Pin-boards
If you are just coming to these posts, have no fear, this quick photo tutorial post will show you the Pinterest pin basics for #TheCrochetLounge pins!
To be Inspired…
There will also be posts from time to time from Crochet Lounge photo submissions through social media and directly to my e-mail highlighting Loungers’ submitted work from OTD/OTM/OTG patterns. Don’t miss out on sharing all your Work In Progress (WIP) eye candy with the rest of the Loungers ♥ Connect with us through facebook, g+, WIP Sundays, twitter and e-mail!
Without further ado, here are the two May Granny Squares OTM pin-boards. Clicking on either photo will bring you to the actual board. If you have never been on Pinterest, please review A How To Guide to Pinterest for The Crochet Lounge pins. You will never have to wonder the pattern source, free or paid, and or if it is just an idea w/o a pattern, again.
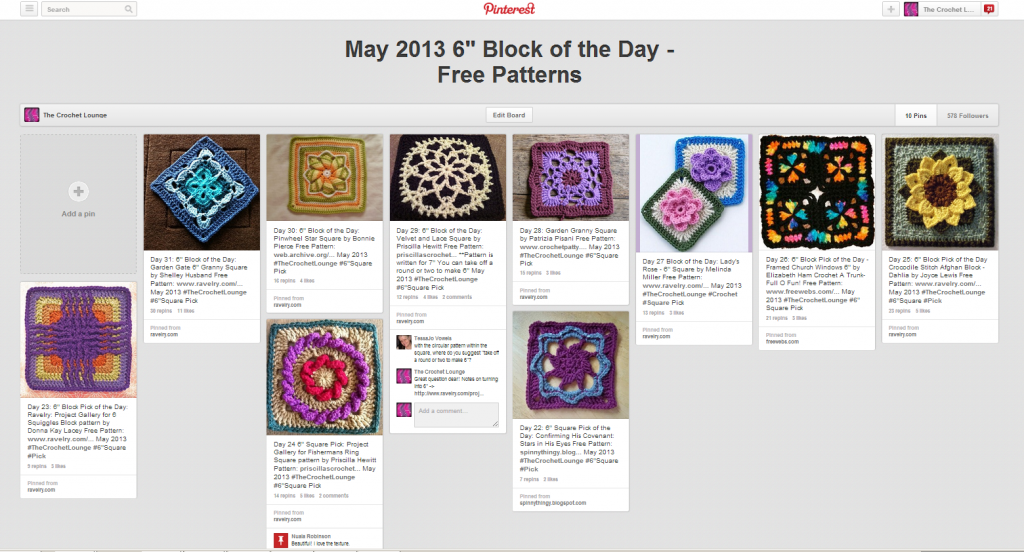
The Crochet Lounge May 2013 6″ Block of the Day - Free Patterns Pinterest Pinboard
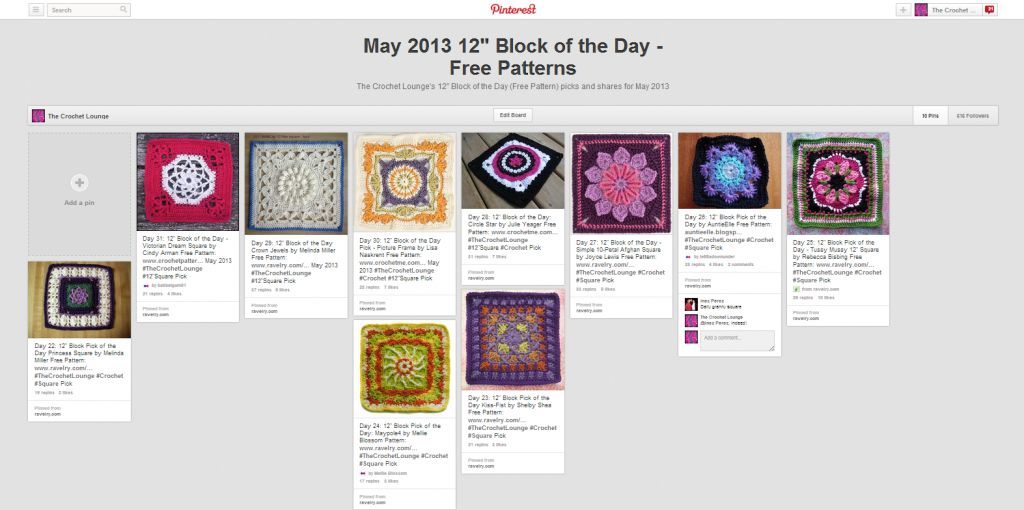
The Crochet Lounge May 2013 12″ Block of the Day - Free Patterns Pinterest Pinboard
Share, Like, Stay tuned & Connect with Me!
Jun 062013
♥ Star Flower Puffy Hearts ♥
Divine Love Series - Free Crochet Heart Patterns
Sweetie Puffs Tiny Hearts (single round) and Sweetie Puffs Tiny Hearts Defined (2rounds) were a hit as heart appliques, stand alone tiny hearts, a gratitude heart in your pockets.

Star Flower Puffy Hearts - Rainbow Pile
For a beginner to crochet and expand on their repertoire, there’s noting more fun than yet another heart that’s just slightly bigger and involves color change, should you wish to try! If you are a beginner to crochet, this is a fabulous way to pick up a few quick new stitches and the single crochet invisible join The Crochet Lounge way.
My now 6 year old asked to learn new crochet stitches recently. What a great way to be motivated to make up another crochet heart pattern she will love to make incorporating the basics she has already learned from the last set. We continue down this Divine Love Series dedicated to my family and my little ones, especially my Cadence Music ♥.
Video Tutorial link will be added here soon.
Materials:
- Any Worsted Weight Yarn (or any yarn with proportional hook sizes)
- Size E/4 (3.5mm) & H/8 (5.00mm) hooks
- Would look great in a single solid color or two slow transition variegated yarn so not to detract from the shape
Stitches Used:
magic circle, ch, sc, dc, slst, invisible join, puff stitch

Star Flower Puffy Hearts - Single Color
Ch4 start at top, Magic Circle start at bottom
Magic circle The Crochet Lounge Way- wrap yarn around finger twice, slip hook under the loops, yo draw up a loop, yo draw through loop to secure the magic circle
Chain (ch) - yo (yarn over), pull through loop on hook
Single crochet (sc) - insert hook in indicated stitch, yo draw up a loop, yo draw through 2
Double crochet (dr) - yo, insert hook in indicated stitch, yo draw up a loop (3 on hook), yo draw through 2 loops (2 on hook), yo draw through 2 loops
Slip Stitch (slst) - insert hook in indicated stitch, yo draw through stitch and loop on hook
Puff Stitch (hdc puff st) - (yo, insert hook into indicated stitch, yo draw up a loop) 4 times [9 loops on hook], yo draw through all 9 loops
Sc Invisible Join (sc invisible join) The Crochet Lounge Way - on last single crochet, insert hook in indicated stitch, yo draw up a loop, insert hook into the back loop only of the first stitch in the round, yo draw through stitch and the 2 loops on hook, pull up 3″ of yarn, cut and work with the 3″ of yarn, insert hook under both loops of the second stitch in the round, yo draw through stitch, insert hook in the front loop only of the last stitch in the round, yo draw through loop, insert hook from the back (wrong) side of work under both loops of the same stitch you just worked, draw yarn to the back so you can weave in the end
Patterns:
Single Colored Heart
Ch4, slst join to 4th chain from hook (if you want the center of the puff flower closed, then use a Magic Circle start, and do not pull the Magic Circle tight until you have completed round 2!)
Round 1:
Ch1, hdc puff stitch into the circle, ch 3,
hdc puff stitch into the circle, ch2,
hdc puff stitch into the circle, ch2,
hdc puff stitch into the circle, ch3,
hdc puff stitch into the circle, ch1,
slst into the circle
switch to E hook

Star Flower Puffy Hearts - Green & Yellow
Round 2:
2sc into the starting Ch1 of Round 1,
(sc, 2hdc) into the top of the first hdc puff stitch,
(hdc, 2dc )into the ch3 spc,
(dc, 2hdc) into the top of the next hdc puff stitch,
(hdc, sc) into the ch2 spc,
(sc, ch2, sc) into the top of the next hdc puff stitch
<Note: This is the tip of your heart and you will now be reversing the instructions to get to the top>
(sc, hdc) into the next ch2 spc,
(2hdc, dc) into the top of the next hdc puff stitch,
(2dc, hdc) into the next ch3 spc,
(2hdc, sc) into the top of the last hdc puff stitch,
slst into the middle of the starting circle, pull the loop up 1/4″ (6mm), take out your hook,
insert hook from the back side through the starting circle and reinsert hook into the last loop,
pull loop through to the wrong side of the heart, cut a 6″ tail (15cm) and draw through the loop
<Note: if you used a Magic Circle start, this is where you would want to close your Magic Circle>
Weave in the ends
Two Colored Hearts
Ch4, slst join to 4th chain from hook (if you want the center of the puff flower closed, then use a Magic Circle start, and do not pull the Magic Circle tight until you have completed round 2!)
Round 1 (with CC):

Star Flower Puffy Hearts Circle
Ch1, hdc puff stitch into the circle, ch 3,
hdc puff stitch into the circle, ch2,
hdc puff stitch into the circle, ch2,
hdc puff stitch into the circle, ch3,
hdc puff stitch into the circle, switch to MC
ch1,
slst into the circle
switch to E hook
Round 2 (continue in MC):
2sc into the starting Ch1 of Round 1,
(sc, 2hdc) into the top of the first hdc puff stitch,
(hdc, 2dc )into the ch3 spc,
(dc, 2hdc) into the top of the next hdc puff stitch,
(hdc, sc) into the ch2 spc,
(sc, ch2, sc) into the top of the next hdc puff stitch

Star Flower Puffy Hearts Column
<Note: This is the tip of your heart and you will now be reversing the instructions to get to the top>
(sc, hdc) into the next ch2 spc,
(2hdc, dc) into the top of the next hdc puff stitch,
(2dc, hdc) into the next ch3 spc,
(2hdc, sc) into the top of the last hdc puff stitch,
slst into the middle of the starting circle, pull the loop up 1/4″ (6mm), take out your hook,
insert hook from the back side through the starting circle and reinsert hook into the last loop,
pull loop through to the wrong side of the heart, cut a 6″ tail (15cm) and draw through the loop
Weave in the ends
Jan 012013
Homespun Pineapple Lapghan or Throw
No matter which way you slice it, the vintage variation stitching of crochet pineapples are simply amazing. Ever think it’s just too daunting of a task to work with thread? This free crochet throw pattern is easy to follow, and fun to make with bulky weight yarn! You will end up with a classy throw with a classic lace pattern that will turn up in a fraction of the time.
Ready, steady, HOOK!

Elegant Homespun Pineapple Throw - a classy classic lace pattern made warm and bulky for your living space.
Materials:
- Lion Brand Homespun Main Colors A, B (2 skeins each) and Contrasting Color C (less than 1 skein) or any bulky weight yarn.
- Size K hook
Stitches Used:
fsc, ch, sc, dc, slst, shell
Foundation single crochet (fsc) – ch2, insert hook into 2nd chain from hook, yo draw up a loop, yo draw through 1 (this creates the next foundation chain), yo draw through 2 (this completes the single crochet)
*insert hook into the next foundation chain just created, yo draw up a loop, yo draw through 1, yo draw through 2
Repeat from * until total fsc completed
Chain (ch) - yo (yarn over), pull through loop on hook
Single crochet (sc) - insert hook in indicated stitch, yo draw up a loop, yo draw through 2
Double crochet (dc) - yo, insert hook in indicated stitch, yo draw up a loop, yo draw through 2 loops, yo draw through last 2 loops on hook
Slip Stitch (slst) - insert hook in indicated stitch, yo draw through stitch as well as the loop on hook
Shell Stitch (Shell) - 2dc, ch1, 2dc

Homespun Pineapple Throw Closeup
Pattern:
Worked in fsc with multiples of 17+2, if you choose to chain and make a row of sc instead of fsc, you will work with multiples of 17+3(for turning chain), then sc in 2nd ch from hook across.
Pattern set repeats (every 7 rows) worked in color sequence:
A, B, A, B, C, B, A, B, A
Fsc 87
Row 1:
Ch1, sc in first st, ch1, skp next st, sc in next st,
*Ch3, skp next 4 sts, 3dc in next st, ch5, skp 3 sts, 3dc in next st, ch3, skp next 4 sts, sc in next st, ch3, skp 2 sts, sc in next st**
Rpt from * to ** 3 more times
Ch3, skp next 4 sts, 3dc in next st, ch5, skp 3 sts, 3dc in next st, ch3, skp next 4 sts, sc in next st, ch1, skp next st, sc in last st
Row 2:
Ch3, turn, 2dc in ch1 spc, ch3, 9dc in ch5 spc, ch3, skp ch3 spc, skp sc,
*Shell in middle ch of next ch3 spc, ch3, skp sc, skp next ch3 spc, 9dc in ch5 spc, Ch3, skp 3dc, skp next ch3**
Rpt from * to ** 3 more times
Skp next sc, 2dc in ch1 spc, dc in last sc
Row 3:
Ch3, turn, 2dc in turning dc,
*Ch3, skp ch3, sc in first dc, ch3, skp next dc, sc in next dc, ch3, skp next dc, sc in next dc, ch3, skp next dc, sc in next dc, ch3, skp next dc, sc in next dc, ch3, Shell in ch1 spc of previous Shell**
Rpt from * to ** 3 more times,
Ch3, skp ch3, sc in first dc, ch3, skp next dc, sc in next dc, ch3, skp next dc, sc in next dc, ch3, skp next dc, sc in next dc, ch3, skp next dc, sc in next dc, ch3, 3dc in top of turning ch3 of row 2
<Note: You are sc-ing into the odd numbered dc in the 9dc shell of row2, and the 4 ch3s on top of the 9dc shell is the beginning of your pineapple>
Row 4: ch3, turn, ch1, 2dc in turning dc, ch3, skp ch3, skp sc, sc in ch3 spc, ch3, sc in next ch3 spc, ch3, sc in next ch3 spc, ch3, sc in next ch3 spc, ch3, skp sc, skp ch3,
*(2dc, ch1, 2dc, ch1, 2dc) in ch1 spc of prev Shell, ch3, skp ch3, skp sc, sc in next ch3 spc, ch3, sc in next ch3 spc, ch3, sc in next ch3 spc, ch3**
rpt from * to ** 3 more times
(2dc, ch1, dc), in top of ch3 of Row 3
<Note: There are 3 ch3 spcs above the pineapple you started in the last round - this will decrease until there is only a single sc at the tip of the pineapple>
Row 5: ch3, turn, Shell in ch1 spc,
*ch3, skp ch3, skp sc, sc in the first ch3 spc, ch3, sc in next ch3 spc, ch3, sc in ch3 spc, ch3, skp sc, skp ch3 spc, Shell in next ch1 spc 2 times**
rpt from * to ** 3 more times
ch3, skp ch3, skp sc, sc in the first ch3 spc, ch3, sc in next ch3 spc, ch3, sc in ch3 spc, ch3, skp sc, skp ch3 spc, Shell in next ch1 spc, dc in top of last round’s turning ch3
<Note: The recurring Shell section is the V-shape between the pineapples. As the top of the pineapple decreases to a point, this V shape will increase to compensate for the crochet-fabric to keep rectangular>
Row 6:
Ch5, turn, Shell in ch1 spc of Shell in row 5, ch3, skp ch3 + sc, sc in next ch3 spc, ch3, sc in next ch3 spc, ch3
*Shell in next ch1 spc of Shell in Row 5, 2dc between the two Shells, Shell in ch1 spc of next Shell, ch3, skp ch3, skp sc, sc in next ch3 spc, ch3, sc in next ch3 spc, ch3**
Rpt from * to ** 3 more times
Shell in ch1 spc of last Shell of row 5, ch2, dc in top of turning ch3 of Row 5
Row 7:
Ch1, turn, sc in turning dc, ch3, Shell in ch1 spc of Shell
*Ch3, sc at top of pineapple in the ch3 spc, ch3, Shell in ch1 spc of Shell, ch3, sc between the 2dc cluster, ch3, Shell in ch1 spc of next Shell**
Rpt from * to ** 3 more times
Ch3, sc at top of pineapple in the ch3 spc, ch3, Shell in ch1 spc of Shell, ch3, sc in 3rd ch of beginning ch5 of Row 6
Change Colors

Bold and warm crochet pineapple pattern done in bulky weight Homespun. A touch of the classic in a modern living room.
Row 8:
Ch1, sc in turning sc, ch1, sc in ch3 spc, ch3, 3dc in ch1 spc of Shell, ch5, 3dc in next ch1 spc of Shell, ch3
*Sc in next ch3 spc, ch3, sc in next ch3 spc, ch3, 3dc in ch1 spc of Shell, ch5, 3dc in next ch1 spc of Shell, ch3**
Rpt from * to ** 3 more times
Sc in next ch3 spc, ch1, sc in first sc of Row 7
Rows 9-14: Rpt Rows 2-7
Continue rpt Rows 8-14 seven (7) more times, changing colors before starting Row 8 each time. Do not break yarn after the last iteration of Row 14.
Ending Row:
Ch1, sc in turning sc, ch1, sc in ch3 spc, ch3, 3dc in ch1 spc of Shell, ch1, tr in ch3 spc, ch1, tr in next ch3 spc, ch1, 3dc in next ch1 spc of Shell, ch3
*Sc in next ch3 spc, ch3, sc in next ch3 spc, ch3, 3dc in ch1 spc of Shell, ch1, tr in ch3 spc, ch1, tr in next ch3 spc, ch1, 3dc in next ch1 spc of Shell, ch3**
Rpt from * to ** 3 more times
Sc in next ch3 spc, ch1, sc in first sc of last row
Border or Edging:
With color C
Round 1:
Work evenly around the edge starting from a corner, slst join, sc, ch3, sc putting a ch3 loop at the corners, slst join to beginning sc
Round 2:
5dc in each ch3 space around, Finish Off.

Simple 2 round edging
Enjoy! ♥~
Ravel This!
Dec 262012
Boomer Toddler Fingerless Gloves (18mo-2T)
Do you have a 18mo-3 year old that runs around the house with palms out or downwards saying BOOM BOOM IRON MAN like mine? Welp, I do! To entertain mommy’s ideal of visual imaginary play, this pair of free crochet fingerless gloves pattern was born.
Note: A 2T’s hands averages 4.5″ wide - if your toddler has a larger hand, please increase your foundation round in multiples of 2

Boom Boom Ironman Toddler Fingerless Gloves (2T) - In Action!
Materials:
- WW cotton in Red, White, Blue
- Size F (3.75mm) & H (5mm)hook
Stitches Used:
fsc, ch, sc, slst, rsc, fphdc, bphdc
Foundation single crochet (fsc) – ch2, insert hook into 2nd chain from hook, yo draw up a loop, yo draw through 1 (this creates the next foundation chain), yo draw through 2 (this completes the single crochet)
*insert hook into the next foundation chain just created, yo draw up a loop, yo draw through 1, yo draw through 2
Repeat from * until total fsc completed
Chain (ch) - yo (yarn over), pull through loop on hook
Single crochet (sc) - insert hook in indicated stitch, yo draw up a loop, yo draw through 2
Slip Stitch (slst) - insert hook in indicated stitch, yo draw through stitch as well as the loop on hook
Front Post Half Double Crochet (fphdc) - yo, insert hook in front from the right hand side of indicated post exiting on the left side of the post, yo draw through around post, yo draw through all 3 loops on hook
Back Post Half Double Crochet (bphdc) - yo, insert hook from right side behind the indicated post and around exiting on the left side of the post in the back, yo draw through around post, yo draw through all 3 loops on hook
Crab Stitch (rsc) - insert hook in st to the right of hook, yo draw up a loop, yo draw through both loops on hook

Boom Boom Iron Man Toddler Fingerless Gloves (2T) - Fusion Circles
Pattern:
Worked in fsc with multiples of 2, if you choose to chain and make a row of sc instead of fsc, you will work with multiples of 2+1(for turning chain), then sc in 2nd ch from hook across.
With Red
Start with 48″ tail (this tail will be used to go around the bottom of the glove in crab stitch
Fsc 18 make sure you do not twist the yarn, join with slst.*
*Note: when joining fsc in a circle, you will need to sew the beginning yarn tail to the bottom of the last fsc stitch to join as well as joining by slst at the top (top is the sc stitch, bottom is the foundation chain portion of fsc)
Round 1: Ch2, (fphdc in next st, bphdc in next st) , join [0fphdc, 9bphdc]
Rounds 2-5: Ch2 (fphdc in each fphdc, bpfdc in each bpfdc around), join [9fphdc, 9bphdc]
Rounds 6-8: Ch1, Sc in each st, join [18 sc]
Right Hand Only
Round 9: Ch1, Sc in next 6 sts, ch4, skip 4 sts in previous row, sc in next 8 sts [18 sc]
Round 10-14: Sc in each sc around, 4sc in ch4 spc, sc in each sc [18sc]
Round 15: Rsc around, fasten off, weave ends
Left Hand Only
Round 9: Ch1, Sc in next 8 sts, ch4, skip 4 sts in previous row, sc in next 6 sts [18 sc]
Round 10: Sc in each sc around, 4sc in ch4 spc, sc in each sc [18sc]
Round 11-14: Sc in each sc around, sc in each sc [18sc]
Round 15: Rsc around, fasten off, weave ends
Both Hands:
Join beginning fsc with 48″ tail , Rsc around, fasten off, weave ends
Fusion Patch (make 2):
With White & F (3.75mm) hook
Round 1: Magic Ring, 6sc in ring, join with sl st [6sc]
Round 2: Ch1, 2sc in each st, Change to Blue, join with sl st [12sc]
Round 3: Ch1, 2sc in same st, 1sc in next st, *2sc in next st, 1sc in next st* join with sl st, fasten off [18sc]
Sew Patch to gloves making sure you are sewing them on different sides (thumb hole in opposite direction on the two gloves - or you may have some ripping to do).

Boomer Toddler Fingerless Gloves (2T) - Turned Spiderman Web shooter :D
Ravel This!
Enjoy! ♥~
Dec 072012
Velvet Crush Infinity Scarf
Do you love texture in your winter scarves? You simply must try this free crochet scarf pattern on for size!! Sometime back in July/August, I followed a post to a video that brought me a new friend in the crochet world. I fell in love with her newly discovered stitch, the Meladora’s Butterfly Stitch. Upon making this infinity scarf, my fellow designer friend, Stacey at Busting Stitches , who creates delicious patterns, helped me name the Velvet Crush! *nom*

Crochet a Velvet Crush Infinity Scarf, a delicious present for the season!
This pattern is short, simple, and SWEET, so grab your hook and yarn & get started!
Materials:
- Any bulky weight yarn or 2 strands of light worsted weight (2 strands of rayon chenille is used in the sample photos), want to do this in regular worsted weight? That’s fine, too!
- Size N hook (you can make this infinity scarf with K~N hook depending on if you prefer a tighter stitch pattern, just adjust the length of your scarf accordingly)
- Would look great in solid colors or slow transition variegated yarn
Stitches Used:
fsc, ch, sc, slst, BFS (butterfly stitch)
Foundation single crochet (fsc) – ch2, insert hook into 2nd chain from hook, yo draw up a loop, yo draw through 1 (this creates the next foundation chain), yo draw through 2 (this completes the single crochet)
*insert hook into the next foundation chain just created, yo draw up a loop, yo draw through 1, yo draw through 2
Repeat from * until total fsc completed
Chain (ch) - yo (yarn over), pull through loop on hook
Single crochet (sc) - insert hook in indicated stitch, yo draw up a loop, yo draw through 2
Slip Stitch (slst) - insert hook in indicated stitch, yo draw through stitch as well as the loop on hook
Butterfly Stitch (BFS) - insert hook in indicated stitch, yo draw up a loop, yo draw through 1 loop, insert hook in next stitch, yo draw up a loop, yo draw through 2, yo draw through 2, ch1
Note: When doing stacked BFS or BFS in the round, the first stitch goes into the ‘right wing’ of the butterfly pattern created in the row/round below and the ‘next stitch’ indicates the ‘left wing’ of the butterfly, so you are always working into the wings.
Ending BFS - after completing the last BFS including the ch1, simply slip stitch into the ch1 space that started the round, then ch1 to start the new round
Pattern:
Worked in fsc with multiples of 2, if you choose to chain and make a row of sc instead of fsc, you will work with multiples of 2+1(for turning chain), then sc in 2nd ch from hook across.
This pattern, using 2 strands of light worsted weight yarn (or single strand of bulky yarn) was worked with an N hook. If you choose to make this infinity scarf with 1 strand of worsted weight yarn, it is suggested you use a K hook or larger for a softer stitch.
Fsc 150 (go up to 180 with a single strand of ww and K hook), make sure you do not twist the yarn, join with slst.*
*Note: when joining fsc in a circle, you will need to sew the beginning yarn tail to the bottom of the last fsc stitch to join as well as joining by slst at the top (top is the sc stitch, bottom is the foundation chain portion of fsc)
Row 1: BFS around in the fsc stitches (2 fsc completes one BFS), when you get to the end, Ending BFS
Rows 2-10: Repeat Row 1
Row 11: Sc in each butterfly wing across, invisible join the last stitch
Enjoy! ♥~

Velvet Crush Infinity Scarf worn
Ravel This!
Dec 032012
Serendipity Ripple Cowl or Neckwarmer
Free crochet cowl pattern — What is your definition of a cowl or neckwarmer? I love the classic definition of hooded garment also covering the neck. What I’ve seen when doing a search on cowls resulted in infinity scarves, mobius scarves, wide enough to cover head if pulled over, and long enough to wrap around the neck twice. Moreover, I love what it has evolved to, a simple neckwarmer.

Serendipity Ripple Cowl or Neckwarmer - Free Crochet Pattern
Worn with double hooks vs. a brooch! A hooker’s dream hook holder on the go.
For now, here’s a neckwarmer inspired by the Serenity Ripple Scarf.
This simple version of the Serenity Ripple Scarf is easy enough for a beginner with no increases or decreases, and challenging enough for a beginner with the introduction to treble crochet (TR), foundation single crochet (FSC) and front post single crochet (FPSC). It tests your ability to count to the number 7! Those who are veteran to ripples know what I’m talking about — it’s the simple numbers that catches us off guard in a pattern.

Serendipity Cowl or Neckewarmer - Free Crochet Cowl Pattern
Hooks vs. brooch! A hooker’s dream hook holder on the go.
Materials:
- Stitch Nation – Debbie Stoller’s Full o’ Sheep ~200yds or any Worsted Weight yarn
** Full o’ Sheep is a heavier worsted weight yarn calling for a K hook and pattern is worked with a J, but pattern will work for any yarn if you customize the length to your desire and customize the width by repeating rows 2 and 3 - Size J hook or hook to obtain gauge
- Would look great in solid colors or slow transition variegated yarn
Stitches Used:
fsc, ch, sc, tr, fpsc
Foundation single crochet (fsc) – ch2, insert hook into 2nd chain from hook, yo draw up a loop, yo draw through 1 (this creates the next foundation chain), yo draw through 2 (this completes the single crochet)
*insert hook into the next foundation chain just created, yo draw up a loop, yo draw through 1, yo draw through 2
Repeat from * until total fsc completed
Chain (ch) - yo (yarn over), pull through loop on hook
Single crochet (sc) - insert hook in indicated stitch, yo draw up a loop, yo draw through 2
Treble crochet (tr) – yo 2 times (3 on hook), insert hook in indicated stitch, yo draw up a loop (4 on hook), yo draw through 2 loops (3 on hook), yo draw through 2 loops (2 on hook), yo draw through 2 loops
Front post single crochet (fpsc) - working around the post of previous row, insert hook from the front, right side of the post through to the left side, yo draw up a loop, yo draw through both loops.
Pattern:
Worked in fsc with multiples of 16+1
**Note: This pattern includes a ~2″-3″ short side edging on each side, please account for it before you determine the length of the foundation
Multiples of 16 +1
80 +1
96 +1
112 +1
128 +1
144 +1
Photos worked with 80+1 fsc. If you would like to work this pattern using a foundation chain, then you would be working 16+2, sc into 2nd chain from hook and each one across for the right number of scs.
The Serendipity Ripple Cowl or Neckwarmer is a standalone piece.
Row 1 (RS):
Ch4, turn (counts as tr), 3tr in turning chain
*tr in next sc, tr in next sc
(skp next sc, tr in next sc) 6 times
tr in next sc#, 7tr in next sc**
Rep from * to ** ending last repetition in #, 4tr in last sc
Row 2 (WS):
Ch1, turn
Sc in turning tr, fpsc in each tr across, sc in top of ch 4 from previous row
Row 3:
Ch4, turn (counts as tr), 3tr in turning sc
*tr in next fpsc, tr in next fpsc
(skp next fpsc, tr in next fpsc) 6 times
tr in next fpsc#, 7tr in next fpsc**
Rep from * to ** ending last repetition in #, 4tr in ending sc
Repeat Rows 2 and 3 until desired width ending with Row 3
Ending Row:
Ch1, turn, sc in turning spc, sc in each st across
Do Not Break Yarn
Suggestion: Make a total of 5 visible strips of the ripple pattern
Ends of the Cowl or Neckwarmer
This is an optional step.
***Make sure you are starting Ends of Cowl or Neckwarmer Row 1 on the WS of the fabric***
Turn work 90degrees clockwise from Ending Row of the Cowl or Neckwarmer to start the Ends of the Cowl or Neckwarmer.
The Ends of the Cowl or Neckwarmer is worked same as the hoodie pattern, in multiples of 8+1 the following pattern is written for having 5 visible strips of the ripple pattern
Row 1 (WS):
Ch1, sc in the turning spot, 4sc in tr bar of the previous row
5sc in each of the next 3 tr bars, 4sc in the last tr bar, sc in foundation sc (25sc)
Row 2 (RS):
Ch1, turn
Sc in the turning space
*Skp 3sc, 7tr in next sc, skp 3sc, sc in next sc
Rep from * ending in sc
Row 3 (WS):
Ch3, turn
*fpsc in second tr of shell
fpsc in next tr 4 times#
Ch3
Rep from * ending end of row at #, ch1, hdc in sc
Row 4 (RS):
Ch4, turn
3tr in same space as turning chain
*Sc in 4th tr (middle tr) of tr-shell in previous row#, 7tr in sc stitch 2 rows below (between the 2 tr-shells. You will be crocheting over the ch3 in row 2 into the sc directly below it in row 1)
Rep from * ending last set at #, 4tr in sc stitch ending 2 rows below
Row 5 (WS):
Ch1, turn
Sc in turning tr, fpsc in next tr 2 times
(Ch3#, fpsc in second tr of next tr-shell
*Fpsc in next tr
Rep from * 3 more times)
Rep from ( to ) ending last repetition in #
Fpsc in second tr of half-tr-shell end of prev row, fpsc in next tr, sc in top of ch4
Row 6 (RS):
Ch1, turn
Sc in the turning space
*Working over the ch3 of previous row, 7tr in sc before next tr-shell 2rows below#, sc in 4th fpsc (middle tr) of tr-shell in previous row
Rep from * ending last repetition in #, sc in ending sc of previous row
Break yarn, weave in ends
Do the same on the other side of the cowl or neckwarmer.

Serenity Ripple Scarf Roll View
Nov 272012
Double Crochet
The double crochet is one of the fundamental and widely used stitches — enjoy this free crochet tutorial.
Double crochet (dc) - yarn over (yo), insert hook in the indicated stitch, yo, draw up a loop [3 loops on hook], yo, draw through 2 loops [2 loops on hook], yo, draw through 2 loops.
Double crochet standard height is represented by 3 chains.
Beginning of the Row: At the beginning of a row where dc would be the first stitch, ch3 is used.
 Tutorial 01")
01) At the beginning of the row, Ch3 to represent a double crochet unless otherwise indicated by pattern
 Tutorial 02")
02) Turn piece Counter Clockwise (or clockwise as long as you are consistent throughout your work — notice that depending on which way you turn either the bump of the stitch will be facing out or the top 2 stitches will be facing out)
Double Crochet Stitch
 Tutorial 01")
01) Yarn Over (yo)
 Tutorial 02")
02) Insert hook in indicated stitch
 Tutorial 03")
03) Yarn Over (yo)
 Tutorial 04")
04) Draw up a loop [3 loops on hook]
 Tutorial 05")
05) Yarn Over (yo)
 Tutorial 06")
06) Pull through 2 loops on hook
 Tutorial 07")
07) Yarn over (yo)
 Tutorial 08")
08) Draw through last 2 loops on hook
A simple and nice use of this stitch is shown in the Holiday Raspberry Truffle Ruffle Scarf pattern. The ruffles are created by double crochets and is a pattern that makes this stitch shine.
Enjoy ♥~
This free crochet tutorial is one of the first of the stitches tutorial series brought to you by TheCrochetLounge.com
Nov 252012
e’s Serenity Ripple Scarf
What more is a free crochet ripple scarf pattern to inspire life and excitement by the way of a Mystery Crochet ALongs (CALs)?! Special thanks to fb Crochet Lounge participants of this CAL.
The Serenity Mystery Scarf is easy enough for a beginner with no increases or decreases, and challenging enough for a beginner with the introduction to treble crochet (TR), foundation single crochet (FSC) and front post single crochet (FPSC).
Would you like this shorter as a cowl or neckwarmer? Visit the Serendipity Ripple Cowl or Neckwarmer pattern!

Serenity Ripple Scarf
Materials:
- Stitch Nation - Debbie Stoller’s Full o’ Sheep ~200-250yds or any Worsted Weight yarn
** Full o’ Sheep is a heavier worsted weight yarn calling for a K hook and pattern is worked with a J, but pattern will work for any yarn if you customize the length to your desire and customize the width by repeating rows 2 and 3 - Size J hook or hook to obtain gauge
- Would look great in solid colors or slow transition variegated yarn
Stitches Used:
fsc, ch, sc, tr, fpsc
Foundation single crochet (fsc) - ch2, insert hook into 2nd chain from hook, yo draw up a loop, yo draw through 1 (this creates the next foundation chain), yo draw through 2 (this completes the single crochet)
*insert hook into the next foundation chain just created, yo draw up a loop, yo draw through 1, yo draw through 2
Repeat from * until total fsc completed
Chain (ch) - yo (yarn over), pull through loop on hook
Single crochet (sc) - insert hook in indicated stitch, yo draw up a loop, yo draw through 2
Treble crochet (tr) - yo 2 times (3 on hook), insert hook in indicated stitch, yo draw up a loop (4 on hook), yo draw through 2 loops (3 on hook), yo draw through 2 loops (2 on hook), yo draw through 2 loops
Front post single crochet (fpsc) - working around the post of previous row, insert hook from the front, right side of the post through to the left side, yo draw up a loop, yo draw through both loops.

Serenity Ripple Scarf Roll View
Pattern:
Worked in fsc with multiples of 16+1
**Note: This pattern includes a ~2″-3″ short side edging on each side, please account for it before you determine the length of the foundation
Multiples of 16 +1
208 +1
224 +1
240 +1
256 +1
272 +1
Photos worked with 208+1 fsc. If you would like to work this pattern using a foundation chain, then you would be working 16+2, sc into 2nd chain from hook and each one across for the right number of scs.
The Serenity Ripple Scarf is a standalone scarf. There is a modified version that is linked to a hoodie as a permanent scoodie set which will be posted soon. Please stay tuned for link to that pattern.
Row 1 (RS):
Ch4, turn (counts as tr), 3tr in turning chain
*tr in next sc, tr in next sc
(skp next sc, tr in next sc) 6 times
tr in next sc#, 7tr in next sc**
Rep from * to ** ending last repetition in #, 4tr in last sc
Row 2 (WS):
Ch1, turn
Sc in turning tr, fpsc in each tr across, sc in top of ch 4 from previous row
Row 3:
Ch4, turn (counts as tr), 3tr in turning sc
*tr in next fpsc, tr in next fpsc
(skp next fpsc, tr in next fpsc) 6 times
tr in next fpsc#, 7tr in next fpsc**
Rep from * to ** ending last repetition in #, 4tr in ending sc
Repeat Rows 2 and 3 until desired width ending with Row 3
Ending Row:
Ch1, turn, sc in turning spc, sc in each st across
Do Not Break Yarn
Suggestion: Make a total of 5 visible strips of the ripple pattern
Ends of the Scarf
This is an optional step.
***Make sure you are starting Ends of Scarf Row 1 on the WS of the fabric***
Turn work 90degrees clockwise from Ending Row of the scarf to start the Ends of the Scarf.
The Ends of the Scarf is worked same as the hoodie pattern, in multiples of 8+1 the following pattern is written for having 5 visible strips of the ripple pattern
Row 1 (WS):
Ch1, sc in the turning spot, 4sc in tr bar of the previous row
5sc in each of the next 3 tr bars, 4sc in the last tr bar, sc in foundation sc (25sc)
Row 2 (RS):
Ch1, turn
Sc in the turning space
*Skp 3sc, 7tr in next sc, skp 3sc, sc in next sc
Rep from * ending in sc
Row 3 (WS):
Ch3, turn
*fpsc in second tr of shell
fpsc in next tr 4 times#
Ch3
Rep from * ending end of row at #, ch1, hdc in sc
Row 4 (RS):
Ch4, turn
3tr in same space as turning chain
*Sc in 4th tr (middle tr) of tr-shell in previous row#, 7tr in sc stitch 2 rows below (between the 2 tr-shells. You will be crocheting over the ch3 in row 2 into the sc directly below it in row 1)
Rep from * ending last set at #, 4tr in sc stitch ending 2 rows below
Row 5 (WS):
Ch1, turn
Sc in turning tr, fpsc in next tr 2 times
(Ch3#, fpsc in second tr of next tr-shell
*Fpsc in next tr
Rep from * 3 more times)
Rep from ( to ) ending last repetition in #
Fpsc in second tr of half-tr-shell end of prev row, fpsc in next tr, sc in top of ch4
Row 6 (RS):
Ch1, turn
Sc in the turning space
*Working over the ch3 of previous row, 7tr in sc before next tr-shell 2rows below#, sc in 4th fpsc (middle tr) of tr-shell in previous row
Rep from * ending last repetition in #, sc in ending sc of previous row
Break yarn, weave in ends
Do the same on the other side of the scarf.

Serenity Ripple Scarf Wrapped
Hey MCAL Survey responders - I chose to put this Exclusive on this post because it was the very first MCAL led by The CrochetLounge™, exciting?!
Nov 252012
Front Post Single Crochet
Although not as often used as other front post stitches, such as front post double crochet, the front post single crochet does provide a unique 3D raised stitch look — enjoy this free crochet tutorial.
Front post single crochet (fpsc) - working around the post of previous row, insert hook from the front, right side of the post through to the left side, yo draw up a loop, yo draw through both loops
 1")
1) Working around the post of previous row, insert hook from the front, right side of the post through to the left side.
 2")
2) Yarn over (yo)
 3")
3) Draw up a loop by drawing through behind the post.
 4")
4) Yarn Over (yo)
 5")
5) Draw through 2 loops.
A simple and nice use of this stitch is shown in e’s Serenity Ripple Scarf pattern. The ridges in between the fan ripple rows are formed by fpsc stitches.
Serenity Ripple Scarf Roll View
Enjoy ♥~
This free crochet tutorial is the first of the stitches tutorial series brought to you by TheCrochetLounge.com
Nov 222012
Holiday Lounge Raspberry Truffle Ruffle Scarf
Have you been dreaming and looking for a lush free crochet ruffle scarf pattern? As soon as I figured out the make up of a ruffle scarf, I couldn’t follow a given written pattern because I knew how I wanted my scarf and while they were close, they did not achieve the fluffy ruffly look in my mind.
Nothing sounds more delicious than a scrumptious Raspberry Truffle, so I set out to make this ruffle scarf the holiday special for moi and it makes for a delightful gift as a finished scarf or as a simple pattern with yarn and hook for a crochet virgin.

Materials:
TLC Amoré 3907 Red Velvet (80% acrylic, 20% nylon) or worsted weight yarn of choice*
Weight: 170g or 6 oz skein Length: ~306m or ~335 yds
Hook Size: 5.0mm or US H/8
Stitches:
Chain (ch) - yo (yarn over), pull through loop on hook
Double Crochet (dc) - yo, insert hook in indicated st (stitch), yo draw up a loop (3 loops on hook), yo draw through 2 loops, yo draw through 2 loops (1 loop on hook)
Pattern:
Ch 200
Row 1: Ch3 (counts as first dc here and throughout) turn, dc in in 4th ch from hook, 2dc in each remaining st across (400dcs)
Row 2: Ch3 turn, dc in turning space, 1dc in next st, *2dc in next stitch, 1dc in next stitch rep from * until end (600dcs)
Row 3: Ch3 turn, dc in turning space, 1dc in next 2 stitches, *2dc in next stitch, 1dc in next 2 stitches rep from * until end (800dcs)
Row 4: Repeat Row 3 (1065dcs)
Weave in Ends ♥
*Note: depending on your hooking tension, you may need more than one skein of yarn - you can even end this ruffle scarf when your yarn supply ends and it would still look good!

I’ve taken mine to the xmas tree, holiday lights, movies, the pier and more! These photos don’t do the scarf justice, more Raspberry Truffle Ruffle photo madness to ensue. How will you be using your free crochet Holiday Lounge Raspberry Truffle Ruffle Scarf pattern? Write a story, send an image, I look forward to your photos!