Lotus Flower Lace Scarf~ Free Crochet Vintage Pattern
Have you ever come across a lovely vintage crochet accessory that is so beautiful you frantically search for a free crochet vintage
pattern everywhere? While a few members of the Crochet Lounge fb group worked up their Queen Anne’s Lace Scarf, our dear friend, and artist, Amanda Watson posted her similarly lacy scarf.

Artist Amanda Watson - Self Portrait in Ball Point Pen
Out of all the requests, Amanda noted it came from a vintage publication, The Creative Wife vol 6 by Sea & Co. Publishings in 1915. Have you ever seen a pattern prior to crochet terms being standardized? While I haven’t seen the actual written pattern for this scarf, from the conversations with Amanda the original pattern stitches read as follows:
‘sc is “twisted rod”….dc is “double twisted rod”….. a chain is a “bead” in “strands of beads” or “crochet around the beaded rope”, hdc is a ”wrapped rod” to crochet 2 together you “marry the stitches” and a shell is a petal!’
Needless to say, without Amanda’s hand drawn chart, I may have avoided this pattern short of giving it all a good giggle - my version in vintage talk after seeing her chart…
“make a strand of 7 beads, marry the stitches. make a strand of 3 beads, crochet around the beaded rope with 13 double twisted rods. Make 4 beads, turn, double twisted rod in the next double twisted rod, *make 1 bead, double twisted rod in the next double twisted rod, repeat 12 times. Make 3 beads, turn, double twisted rod in the next bead, make 3 more beads, turn work to its side and make a petal with 6 double twisted rods into the side of the double twisted rod …. *gets dizzy*”
Without further ado, the ‘translated’ written pattern from Amanda’s chart is included below.
Materials:
- Any weight yarn (suggested dk, worsted weight, bulky makes the motifs pop)
- Hook to match yarn
- The photos in this project is worked with Araucania Panguipulli #8 and a J/6.0mm hook
Stitches Used:
ch, slst, dc
Chain (ch) - yo (yarn over), pull through loop on hook
Slip Stitch (slst) - insert hook in indicated stitch, yo draw through stitch and loop on hook
Double Crochet (dc) - yo, insert hook in indicated stitch, yo draw up a loop, yo draw through 2 loops on hook, yo draw through remaining 2 loops on hook
Video Tutorial:
Written Pattern:
Ch7, join with slst to form a ring
Motif #1:
Row 1: (crocheting over the tail)
Ch3, 13dcs into the ring
[Ch3, 13dcs]
Row 2:

Lotus Flower Lace Scarf Chart created by Amanda Watson
Ch4, turn, (dc, ch1) in next dc 12 times, dc in top of ch3 of row 1
[ch4, 13dcs, 12 ch1 spcs]
Row 3:
Ch3, turn, dc into the first ch1 spc
<Note: Turn the work 90 degrees clock-wise (90cw) - you will be working into the dc you just created>
<Lefty’s Note: Turn the work 90 degrees counter clock-wise (90ccw) - you will be working into the dc you just created>
*Ch3, 6dc into the dc bar you just created
<Note: This forms a petal, when done, back to crocheting into the previous row>
Skp a ch1 spc, slst into the next ch1 spc**
Repeat from * to ** 4 more times
<Note: You are crocheting into the odd numbered ch1 spaces created in the previous row e.g. #1 ch1 spc, #3, #5, #7, etc. skipping over the ones in between>
Ch7, slst to the top of ch3 of row 2
<Note: the Ch7 is the start of the semi circle/ring for the next motif>
[5 Ch3, 5dc, 5petals of (ch3, 6dc), ch7, slst]
Motif #2
Row 4:
Ch3, turn, 13dcs in ch7 space, slst to the top of ch3 of the last petal formed in the previous motif
[Ch3, 13dcs, slst]
Row 5:
Ch4, turn, (dc, ch1) in the next dc 12 times, dc in the top of ch3 of Row 4
[Ch4, 13dcs, 12ch1 spcs]
Row 6:
Ch3, turn, dc into the first ch1 spc
<Note: Turn the work 90 degrees clock-wise (90cw) - you will be working into the dc you just created>
<Lefty’s Note: Turn the work 90 degrees counter clock-wise (90ccw) - you will be working into the dc you just created>
*Ch3, 6dc into the dc bar you just created
<Note: This forms a petal, when done, back to crocheting into the previous row>
Skp a ch1 spc, slst into the next ch1 spc**
Repeat from * to ** 4 more times
<Note: You are crocheting into the odd numbered ch1 spaces created in the previous row e.g. #1 ch1 spc, #3, #5, #7, etc. skipping over the ones in between>
Ch7, slst to the top of ch3 of row 2
[5 Ch3, 5dc, 5petals of (ch3, 6dc), ch7, slst]

Lotus Flower Lace Scarf by Amanda Watson Size 3.75mm hook
Motif #3:
Row 7:
Ch3, turn, 13dcs in ch7 space, slst to the top of ch3 of the last petal formed in the previous motif
[Ch3, 13dcs, slst]
Row 8:
Ch4, turn, (dc, ch1) in the next dc 12 times, dc in the top of ch3 of Row 4, slst to the top of ch3 of the 4th petal formed in 2motifs prior to the current one (e.g. if you are making motif #3, then you will be slst to the 4th petal of motif #1)
[Ch4, 13dcs, 12ch1 spcs, slst]
Row 9:
Ch3, turn, dc into the first ch1 spc
<Note: Turn the work 90 degrees clock-wise (90cw) - you will be working into the dc you just created>
<Lefty’s Note: Turn the work 90 degrees counter clock-wise (90ccw) - you will be working into the dc you just created>
*Ch3, 6dc into the dc bar you just created
<Note: This forms a petal, when done, back to crocheting into the previous row>
Skp a ch1 spc, slst into the next ch1 spc**
Repeat from * to ** 4 more times
<Note: You are crocheting into the odd numbered ch1 spaces created in the previous row e.g. #1 ch1 spc, #3, #5, #7, etc. skipping over the ones in between>
Ch7, slst to the top of ch3 of Row 8
<Note: the Ch7 is the start of the semi circle/ring for the next motif>
[5 Ch3, 5dc, 5petals of (ch3, 6dc), ch7, slst]
Repeat Motif #3 until desired length
<Note: You will work one last motif>
Ending Options:
From speaking with Amanda, the original publication doesn’t tell you how to finish the work, so with minor creative insert, here are 2 different options.
Option 1: Ending with a ch5 instead of ch7 space before the ending motif
Ending Motif:
Row 1:
Ch3, turn, 11dcs in ch5 space, slst to the top of ch3 of the last petal formed in the previous motif
[Ch3, 11dcs, slst]
Row 2:
Ch4, turn, (dc, ch1) in the next dc 10 times, dc in the top of ch3 of Row 4, slst to the top of ch3 of the 4th petal formed in 2 m motifs prior to the current one (e.g. if you are making motif #3, then you will be slst to the 4th petal of motif #1)
[Ch4, 11dcs, 10ch1 spcs, slst]
Row 3:
Ch3, turn, dc into the first ch1 spc
*Ch3, 6dc into the dc bar you just created
Skp a ch1 spc, slst into the next ch1 spc**
Repeat from * to ** 4 more times
Slst to the top of beginning ch3 of Row 2
Fasten Off
[Ch3, dc, 5 petals, of (ch3, 6dc), slst]
Option 2: Ending flower before Ending Motif as you have carried on for the entire scarf (ch7 space)
Row 1:
Ch3, turn, 13dcs in ch7 space, slst to the top of ch3 of the last petal formed in the previous motif
[Ch3, 13dcs, slst]
Row 2:
Ch4, turn, (dc, ch1) in the next dc 12 times, dc in the top of ch3 of Row 4, slst to the top of ch3 of the 4th petal formed in 2motifs prior to the current one (e.g. if you are making motif #3, then you will be slst to the 4th petal of motif #1)
[Ch4, 13dcs, 12ch1 spcs, slst]
Row 3:
Ch3, turn, dc into the first ch1 spc
<Note: Turn the work 90 degrees clock-wise (90cw) - you will be working into the dc you just created>
<Lefty’s Note: Turn the work 90 degrees counter clock-wise (90ccw) - you will be working into the dc you just created>
*Ch3, 6dc into the dc bar you just created
<Note: This forms a petal, when done, back to crocheting into the previous row>
Skp a ch1 spc, slst into the next ch1 spc**
Repeat from * to ** 5 more times
<Note: You are crocheting into the odd numbered ch1 spaces created in the previous row e.g. #1 ch1 spc, #3, #5, #7, etc. skipping over the ones in between>
Slst to the top of beginning ch3 in Row 8
[5 Ch3, 5dc, 6petals of (ch3, 6dc), slst]
Video Tutorial:
Connect with me here: ♥ ![]()
![]()
![]()
![]()
![]() ♥ Stay tuned and SHARE!
♥ Stay tuned and SHARE!
1st Motif up to Row 3 Photo Tutorial
-

- 01) Motif 1 - Starting Chain Ch7
-
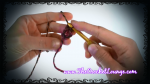
- 02) Motif 1 slst join to 7th ch from hook
-
- 03) Row 1 Start Ch3
-

- 04) 13dc into starting circle
-

-
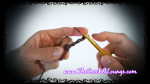
05) Row 2:
Ch4
-
- 06) Row 2 second stitch placement on top of second stitch of previous row
-
- 07) End of Row 2 Count Ch4, 12 ch1 spcs, 13 dcs
-

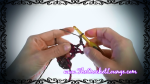
- 08) Motif 1 Row 3 Start Ch3
-

- 09) Motif 1 Row 3 Second Stitch Placement dc into ch1 spc
-

-
10) Motif 1 Row 3 Petal
Turn work 90 Degrees Clockwise
-

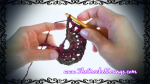
- 11) Motif 1 Row 3 First Petal Completed (Ch3, dc in next ch1 spc, turn work 90CW, 6dc into dc bar just created)
-

- 12) Working into Row 2 Skip next ch1 spc, slst into next ch1 spc


This scarf is awesome! Thank you!! :).
______
Lee Ann H
Crochet…Gotta Love It! Blog
Crochet…Gotta Love It! Website (crochet names and rosary patterns)
this has got to be the MOST beautiful scarf I’ve seen in about 25 years….BEAUTIFUL!!!
I ♥ it, too
Will you email a photo of your finished scarf or Ravel it on Ravelry when done?
Made this for my youngest sisters birthday gift! Think shes gonna love it! Thanks:)
♥
I started this pattern and was able to follow it up to where we start the second petal. Then it says to repeat from * to ** however, the last stitch I had done was to slip stitch into the ch 1 space but the beginning stitch of this row said “Ch3, turn, dc into the first ch1 spc” then we turn and work into the top of the dc stitch just worked, so there is no dc stitch to stitch into at the end of the section between the * and **. then I found the pictorial guide but it only takes me to the point where I was having trouble. It appears that there is a link to a video but when I clicked on it it says “page not found”. I’m hoping that it is just an error in the address and the video will be available soon. Maybe I just need to ch 3 and add a dc after I sl st into the indicated ch 1 space but it is not clear in the pattern that I should do that. I will try that and see how it goes but hopefully you will have the link to the video fixed (and maybe an addendum to the pattern) for anyone else who may also get stuck like I did.
Becky:
I sent you an e-mail along with a blown up portion of Amanda’s diagram of Row 3 where you are experiencing trouble. The Notes to the readers included in section are generally helpful to the rows directly above them. On Crochet Charts, they generally start at the bottom and are numbered by the flow of the rows. The video link is working - WP omitted the “http://”. Hope the diagram, e-mail, video will help you finish your beautiful scarf!
♥,
~e
I LOVE this scarf. I’m making this for myself…it’s the only scarf I’ve felt inspired to crochet. Thank you for sharing.
This is absolutely beautiful! I feel inspired to make this scarf, despite looking a bit complicated. I’m sure the one I’m working on has a couple of mistakes, I’m getting confused with where to join each of the 7ch slst, but I’m improvising and it still looks close to the pattern. Thank you for explaining this so thoroughly, I’m very grateful for you sharing this gorgeous pattern <3
Hey Kat~
The video should resolve the ch7 join issue you are having (or the chart by Ms. Watson)? I can’t wait to see the end finished object photo. Please do e-mail me or Ravel It by clicking on the Ravelry button at the bottom of the page ♥
Just to let you know, I like working with design charts. Yours is outstanding with the different colors!!!! Like it.
This pattern is so pretty and delicate, just what I’ve been looking for. I used Patons classic Wool in Kimono. Would you mind if i post pics to my Pintrest board if I link back to your site?
Post away! I can’t wait to see them :). If you are on ravelry, could you please add it there as well?
i can’t believe it
its much easier than it looks
thanks a lot
Thanks so much for the pattern. I also am having trouble with the second motif I will keep trying though.
Valerie! Come show me photo of where you are stuck and I can help email me [email protected]
Thank you for sharing; can’t wait to start on it. Happy Holidays. Mariana
Just can’t wait to start this beautiful scarf first for myself then for daughter ad granddaughters. Thanks for sharing!
This is an absolutely beautiful scarf. I’m working on my second one now. I’m going to use the second ending type this time. IDK which one I’ll like the best. Thanks for putting this out here I’m terrible with crochet directions for some reason. Soo it really helps me when there is a video tutorial that I can follow along with. Thanks and Lord bless ya!
This is absolutely GORGEOUS!!!! I love it! Thank you sooooo much.
I love the pattern and find it very easy to follow. I have a question about being able to sell any finished products? With pattern credit attached to the item, is it possible to sell the finished item? Trying to raise money for a possible IVF procedure.
How beautiful! Love it and maybe I´ll finish a couple before Christmas: a gift for a friend and another one for me Thanks for shraing
I wish there were many more vintage patterns out there. This is beautiful!